1. Concept
OmniBPM (Omni Business Process Management) is an enterprise BPM software based on the concepts of "documents" and "workflows". Setting of "Documents" remain flexible and enterprises may add additional fields in accordance with their needs. While the function of "Workflows" could be set in accordance with enterprises' needs and further setting on completion of documents of respective users are available also. This remains a very flexible function and when the basic concept is mastered, each and every company will be able to design their own suitable workflow.
To understand this system, it is recommended that system administrator of enterprises could read this document in sequence. Ordinary users could start reading at Start the first workflow.
In this document, different messages are represented as follows;
|
|
Additional Information |
|
|
Important Information. If they are not followed, the expected outcome could be different. |
|
|
Tips while using the system. |
1.1. Document
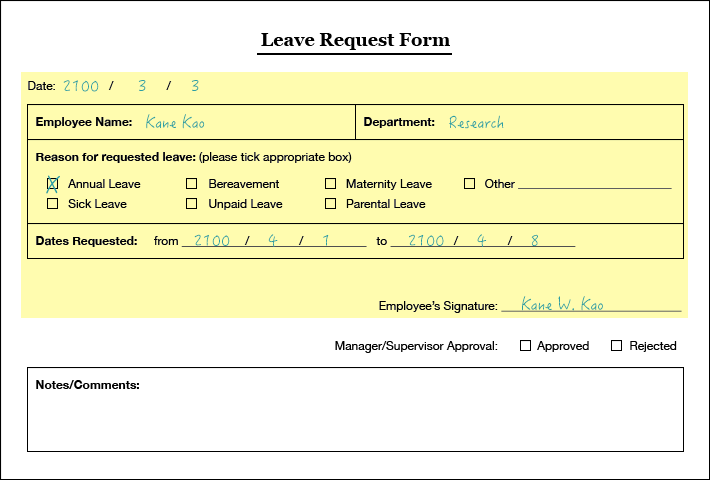
Take leave request form as an example:

In OmniBPM system, it is a document.
1.2. Form Template
A template is a blank form. For example, we call a blank leave request form a template. A template could produce many documents of the same kind, for example:

1.3. User Tasks and Workflow
Usually a document is completed through contribution by different Users. For instance, a leave request is contributed by a requestor, supervisor of the requester, and maybe HR personnel. To complete a leave request, there will be three "Tasks”
-
Requester have to complete the leave request form first.
-
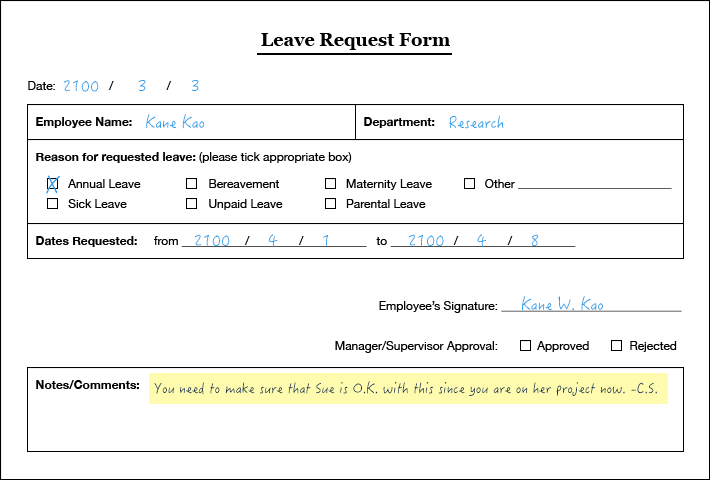
Then the supervisor will check and approve, possibly giving comments. Here the supervisor asked if Sue is okay with the request.
-
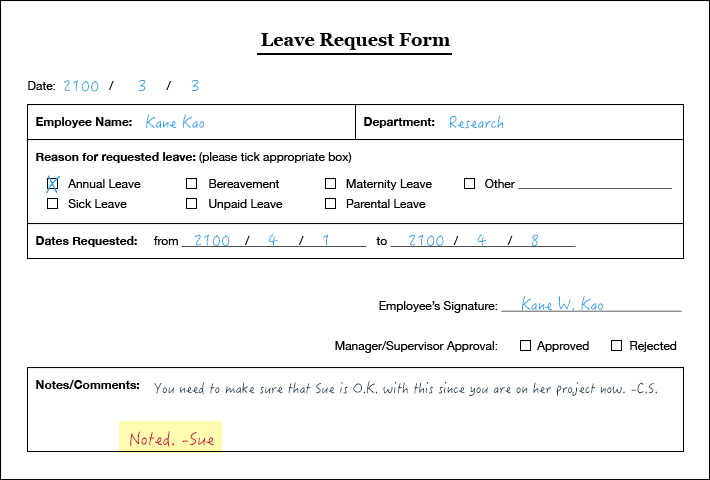
Sue okayed the request.
-
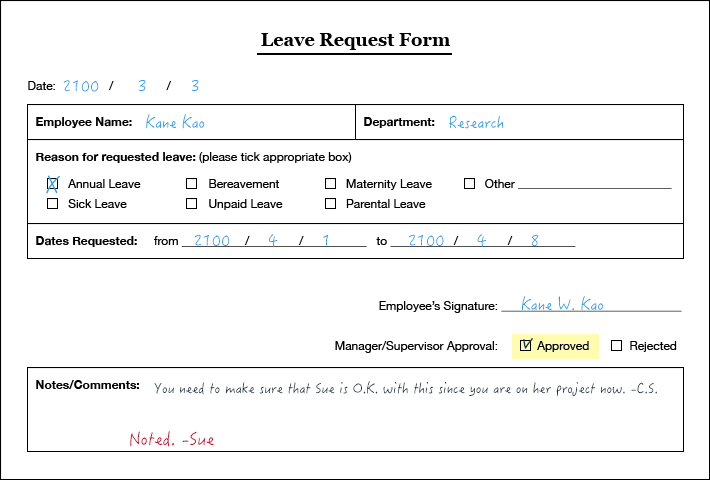
The surpervisor approve the request.
-
Finally requestor will receive supervisor feedback.
Each task determines who is going to fill which field, and the order of completion between tasks. All tasks together form a Workflow.
The captioned is the most basic concept. The powerful functions of OmniBPM are all derivated from such, for instance when assigning users, they could be classified through their seniority and departments. Tasks could also be done through non-liner way, or even division. Further explanations will be featured.
2. Start using OmniBPM
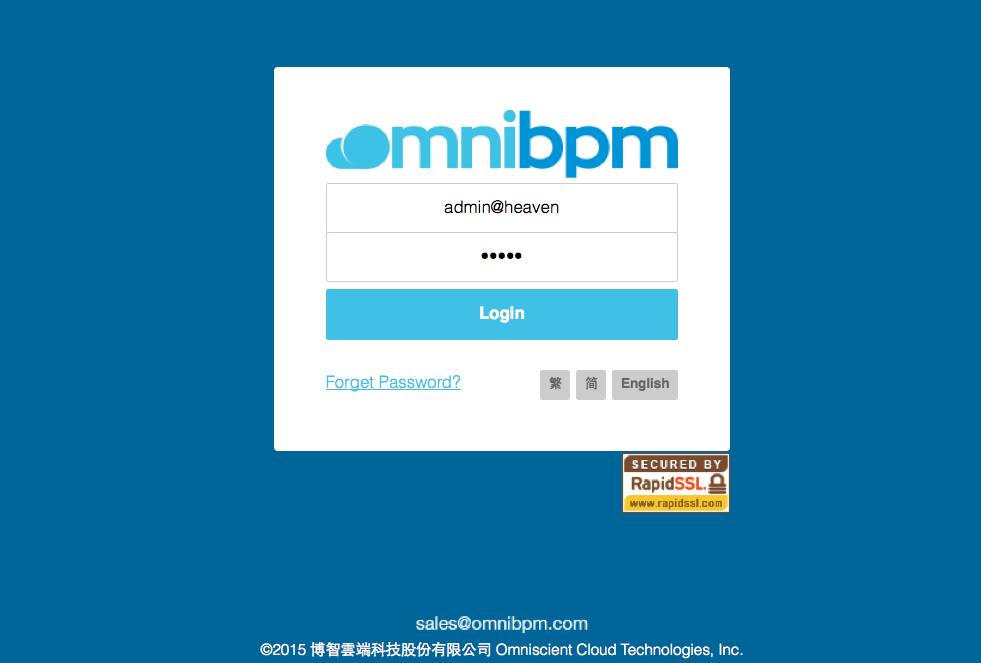
This is the login screen of OmniBPM, enter your user ID and password to log in.
|
|
The format of user ID is “User Name”@”Company Code” |
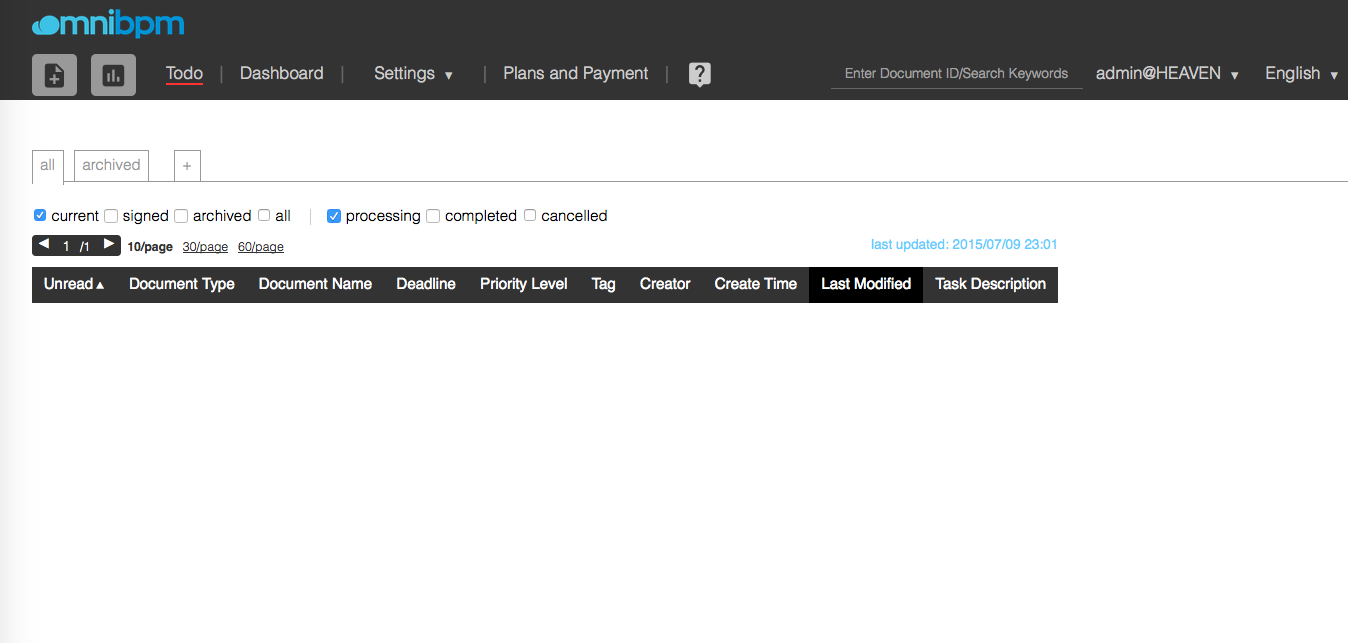
After logging in, the following main screen will be shown.
3. Basic setting
To allow proper document sending and email notification functions of OmniBPM, before using the system, there is some basis setting that has to be done.
Please choose the upper menu “Settings” → “Organization and Permission Settings” to enter the administrative panel.
3.1. Functions of department and Groups(Job Functions) in the system
The main purpose of setting departments and levels are used to determine each user’s immediate supervisor. When the department head is not set, the system will automatically identify the highest officers of the department as the department head. Departmental director may also be set separately. Departmental head setting does not limit to which department s/he belongs to.
|
|
A person may be set to oversee several departments if s/he is in charge of several departments. |
During approval, a user’s immediate supervisor will be the director of his department. When a user is at the most senior ranking of his department, his immediate supervisor will be the parent department in charge of his department.
Roles of department heads in the system are:
-
When the process has to be approved by supervisor, the system will determine who should be given to sign-off the document.
-
The system will send daily to-do list of each person to their immediate supervisor.
-
When setting permissions, department could be considered as a unit.
-
While designing workflow, individual personal of department could be set as the responsible unit.
|
|
When using department during permission settings or workflow design, only personnel belonging to the department will be included. Personnel of senior department or sub-division of the department is not included . |
Enterprises can set their own departments in accordance with their own organizations. Each user belongs to a department. After clicking “Department” on the left menu, press "+" button to create a department. Department can be of tree structure. When adding any sub-department, press "+" after the parent department to create a sub-department.
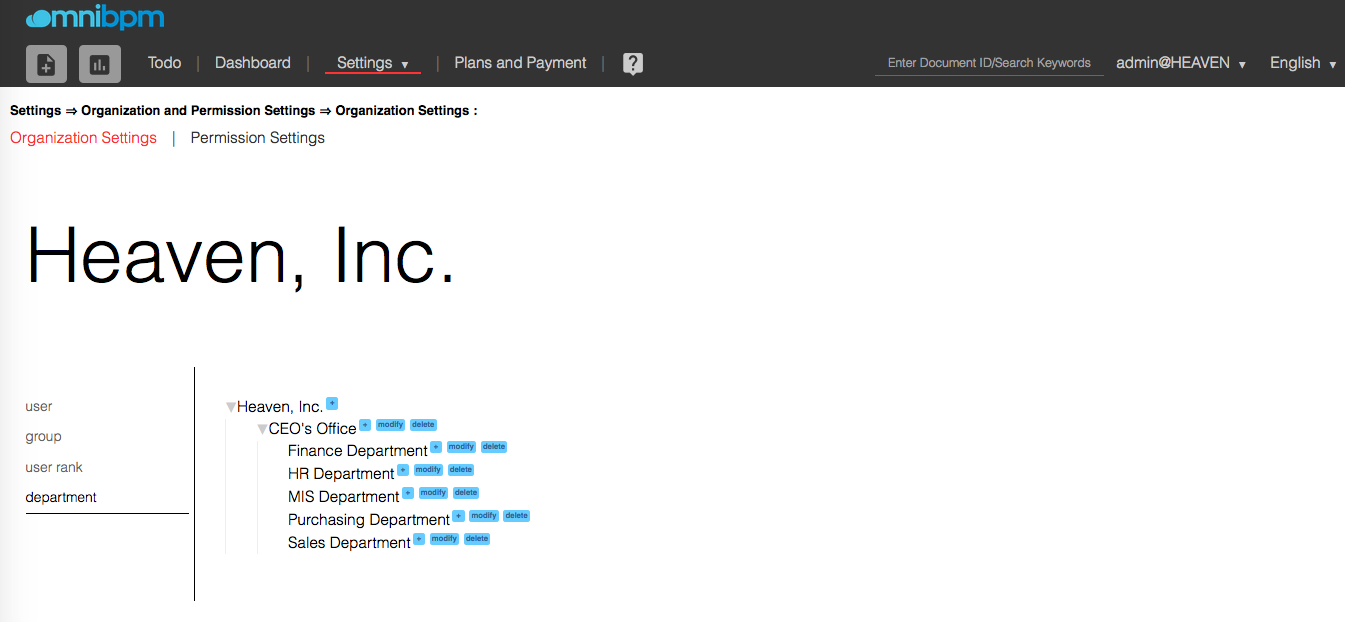
If you need to change the structure of departments, please press Modify and then move the department to the new designated parent department after pressing "+".
Setting department heads: Please also press "modify"
After clicking on the "rank" on the left menu, enter the designated name of level and press "+" button to add new ranks.
People of senior levels will be placed at a higher place, and the general manager should be in the highest position.
When the level of order is to be changed, you can use the mouse to drag.
![]()
3.2. User Configuration
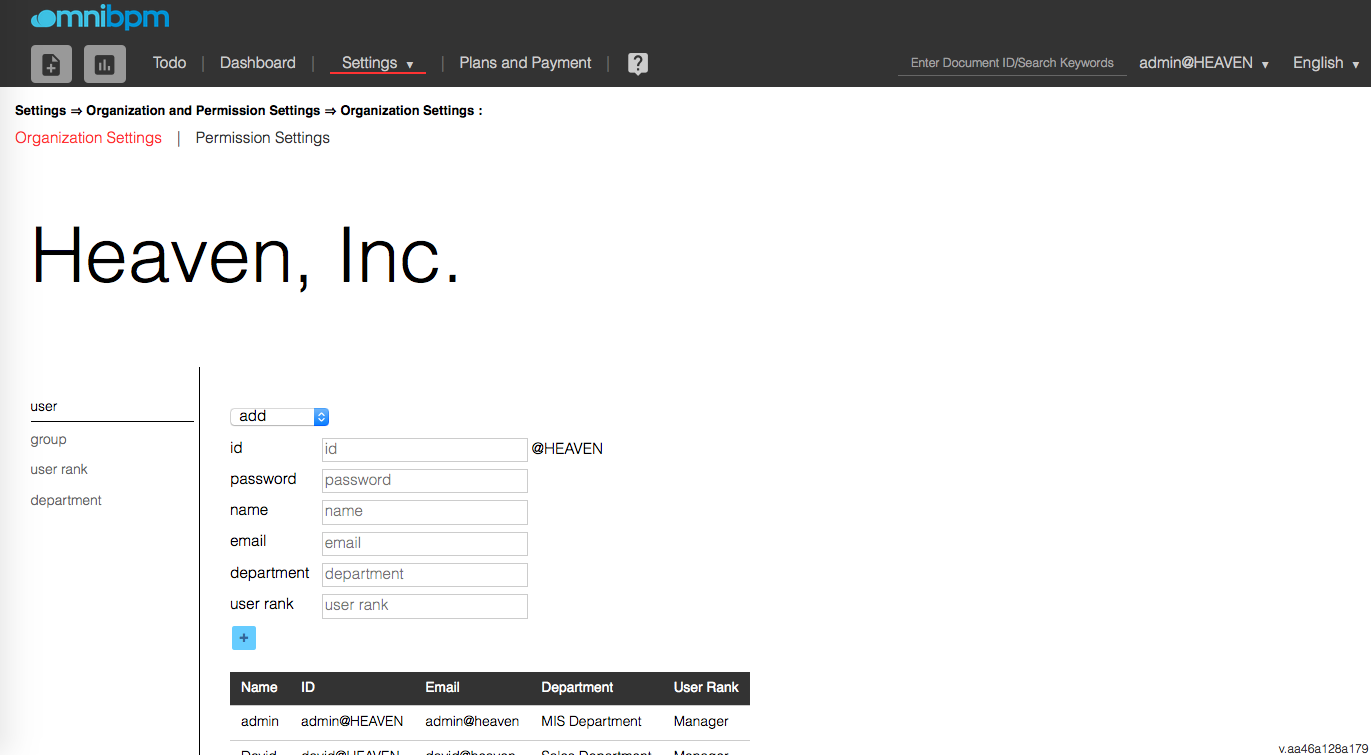
To help each of the company’s employees to create a user account, click on the "User" button on the left menu, enter your account information and click the "+" button to create a user . To-Do list will be sent daily by e-mail to the preset account.
|
|
When users sign in, their user ID will be "account@company code", no company code will be added when you add users. |
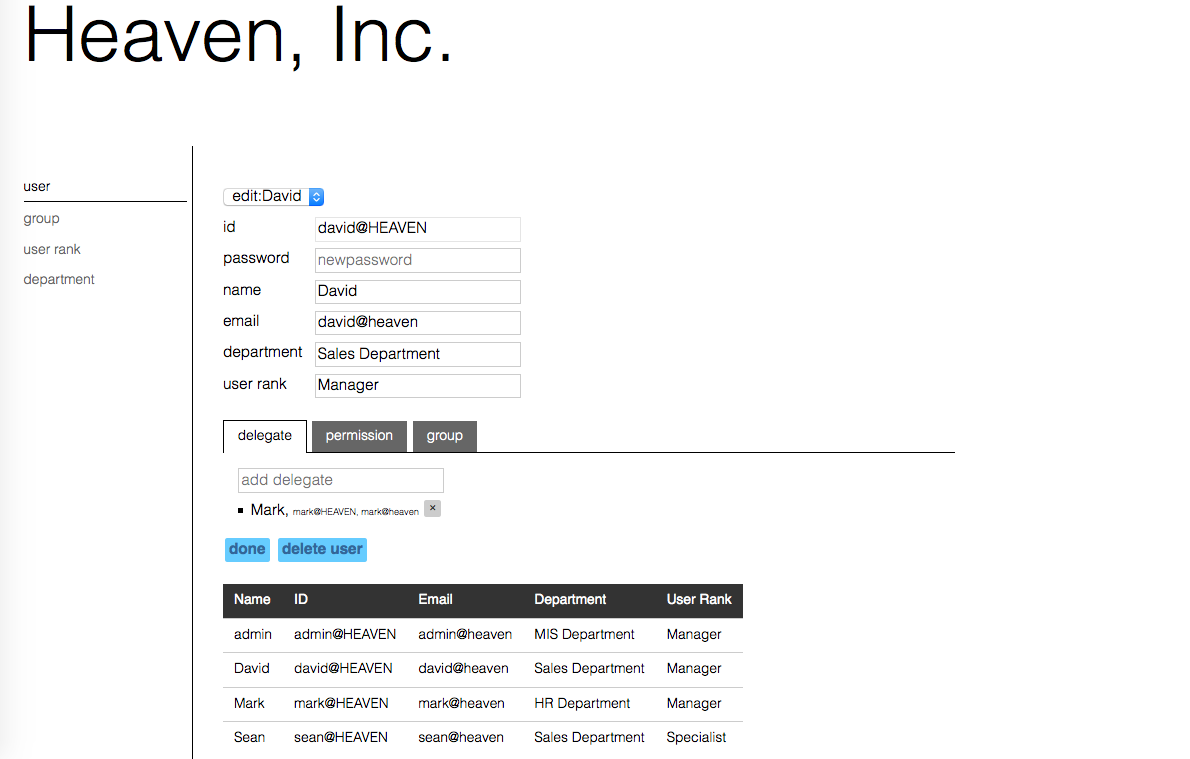
Click on the list below and edit the user. While editing, users’ agent could also be set but also can set the user
-
Delegated officer
Any delegated officer of him/her can also be set by the user, please refer to the Delegation section.
-
Permission
Setting of permission is equivalent to the setting in the system through "Settings" → "Organization and Permission Settings" → "Permission Settings". There are defined sets of privileges and please refer permission settings section .
+ Groups ( Job Functions ) will be introduced in the next chapter.
3.3. Group (Job Functions)
Groups are a more flexible way of classification than department, an employee can belong to multiple groups, employees from different departments could also be added into the same group.
|
|
While designing the flow, similar work will generally be set to be completed by the same group of personnel. Groups can be set directly through the list of people to achieve the transfer of work within an enterprise. Also when one overworks, more staff could be assigned to handle , you can also increase the number of people within the group by the responsible officer. |
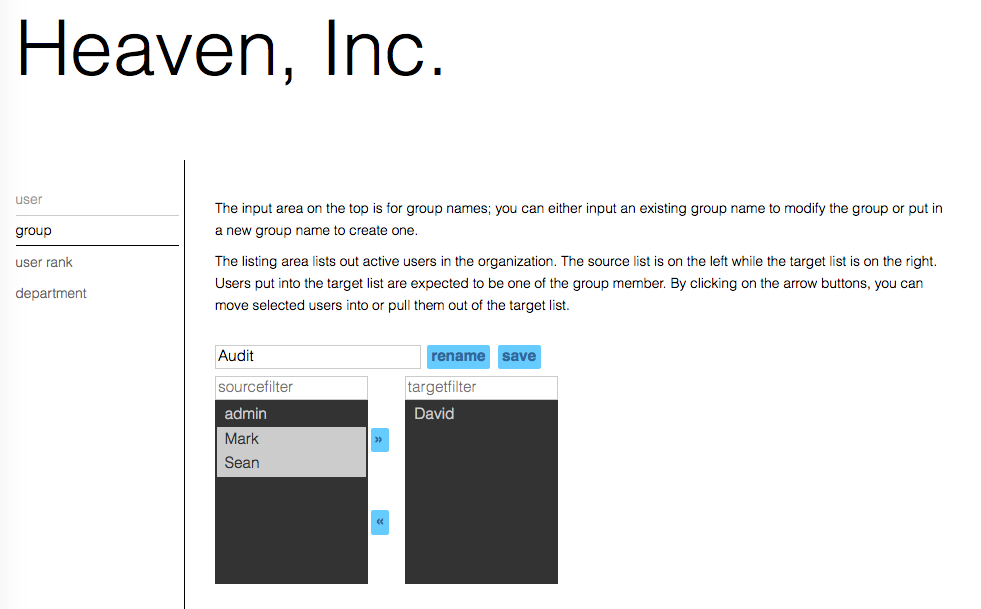
Please enter the group name and then press "+" to create a group.
|
|
During the initial settings, you need not immediately establish all groups. Groups can be added later one in accordance with the design process. |
This screen has two dark gray lists, the left refers to 'user not in the group , while the right one refers to "user within a group." To add a user or remove from the group , press the "》"or "《" to them from left to right or vice versa. After click the ‘group’ menu on the left, enter a group name , then select the user to be added from the user list on the left . Press "》" button to select the user to join the group , or select the user to be removed within the right of the list and press "《"button .
After selecting a user, please click "Save" to save the changes.
To edit a group, click the entry field of the name of the group, a group list will now appear. You can then edit. After editing, please click "Save" to save the changes.
3.4. Delete current users
When a staff needs to be removed the officer 's account, it will be necessary to delete the account to prevent leaking of business information. To delete any current user, administrator only needs to click on the user and then press " elete user" OmniBPM system’s approach is based on number of active users in an enterprise. Remove unused account also helps reduce the cost of system.
A user is deleted means that they can no longer enter the system, but the system does not delete any files. It is recommended to also conduct the following actions:
-
Delegation
After setting delegated officer, new documents shall be handled by the delegated officer.
-
E-mail
Tasks assigned to deleted personnel will still be sent by e-mail every day, so his email should be set to his delegated officer.
-
Groups ( Duties/Job Functions )
If one member is the only member of a particular group, new member should be added and he could either be his agents or new employees. Otherwise, when any specific tasks requires handling of that group of person, there will be no one handling such.
When any account is accidentally deleted, or when people get back to post, you can click the account and then click the "reactivate user" to restore the account.
|
|
Remember to re-examine whether the agent, e-mail, permissions, etc. group settings need to be adjusted . |
4. Permission management
Permission management may be carried out through "Settings" → "Organization and Permission Settings" → "Permission Settings".
| Permission | Restricted function | Help |
|---|---|---|
Permission Settings |
"Settings" → "Organization and Permission Settings" → "Permission Settings" |
|
User Rank Settings |
"Settings" → "Organization and Permission Settings" → "Organization Settings" → "Rank Settings" |
|
Department Settings |
"Settings" → "Organization and Permission Settings" → "Organization Settings" → "Department Settings" |
|
User Settings |
"Settings" → "Organization and Permission Settings" → "Organization Settings" → "User Settings" |
|
Group Settings |
"Settings" → "Organization and Permission Settings" → "Organization Settings" → "Group Settings" |
|
Workflow Template Management |
"Settings" →"Workflow and Form Settings" → "Workflow Editor", "Workflow Menu Settings", "drop-down menu items" |
|
Document Accessibility Permission Settings |
"Settings" →"Workflow and Form Settings" → "Workflow Permissions" |
|
Workflow Error Management |
"Settings" →"Workflow and Form Settings"→ "Workflow Runtime Problems" |
|
Public Tag Management |
"Settings"→ "Manage Tag"→ "Public Tag" |
General users can only manage their own tag, some people can manage global tag. Details may refer to Tagging chapter. |
Report Management |
"Settings"→"Report Settings" |
|
Dashboard.all |
"Dashboard" |
General users can only see their own data, privilege one can oversee data of the whole company. |
5. Adding a new template (Adding a new workflow/form/business process)
We take "Leave Request" as an example. Click on the top menu "Settings" →"Workflow and Form Settings" → "Workflow Editor" to create a new process.
There are six steps to create a new workflow:
-
Name the workflow
-
Add fields to the form
-
Design workflow
-
Specify correspondence between workflow tasks and form fields
-
Preview
-
Complete ( and set permissions )
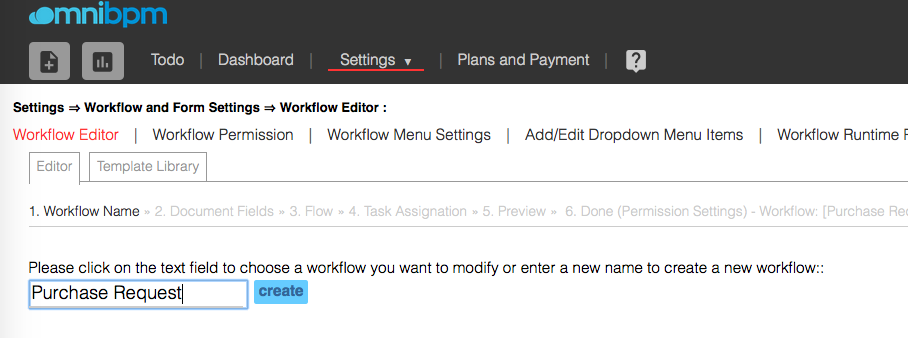
5.1. Name of workflow
Enter the name of the process. Here we enter the "Leave Request", then click " Create".
5.2. Form Fields
After a new workflow is created, the first step is to design the form used in the workflow by adding fields into the document.
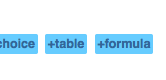
Each document field should have their owndata type. System support the following data types: integers, real numbers (with decimal point) , text, date , date and time, boolean, formula, or the choice(drop-down) menus. OmniBPM can also add new tables to a form. Properties of each column of the table can also be used in accordance with the actual needs. To add a new field, following the required properties like "+integer", etc.

|
|
When extra padding or descriptive text is needed for the form, you can use "+space" to add empty spaces or other descriptions/instructions to the form. |
After pressing the properties of fields, the fields will then be added into template. At this time, the name of the field must be set and the interface are as follows:
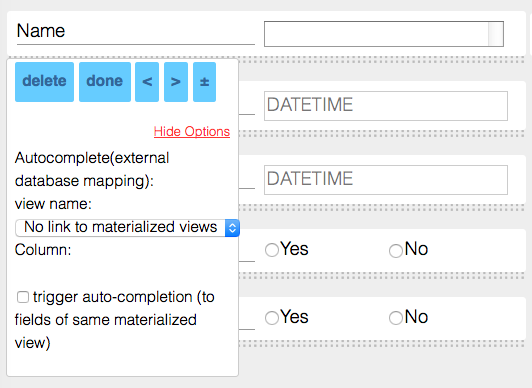
-
±
Increase / decrease the width of this field
-
<
Reducing the portion of width of this field in the column
-
>
Increasing the portion of width of this field in the column
-
Link to External Databases
Please refer to External Database section on configuring external database links.
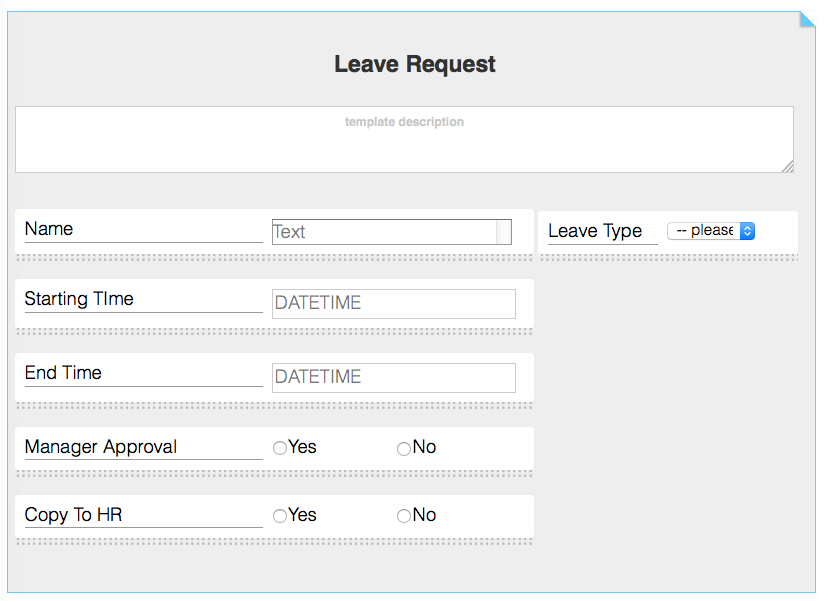
In this example, we sequentially add six fields:
-
Requester Name
First, click the "+text" button , the system will add a field into the form. Enter the name of the field "Name" , and press "Done".
-
Types of leave("+choice")
Click " +choice " and enter the "Leave Type" as the field name. Choose "new choice group" from the right drop-down menu. Enter “Leave Type” as the name of the choice group and press "Add".
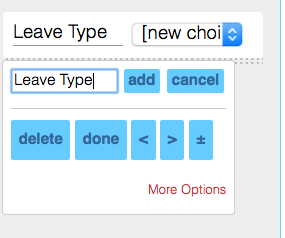
After adding the new choice group, make sure the top right corner of the drop-down menu has been selected as the "Leave Type" Click "done".
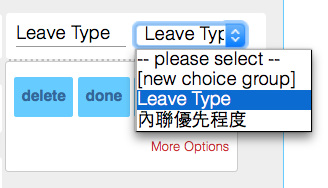

We only add a "Choice Group" in the example. The real choices (drop-down) options (for example, " sick leave", "personal leave", "maternity leave") can be set in "Settings"→"Workflow and Form Settings" → "Add / Edit drop-down menu items" . -
Start Time/End Time
Similarly, click the "+date and time" , add a "Start time"/"End time" field.
-
Manager Approval ("+boolean")
-
Copy to HR ( + boolean)
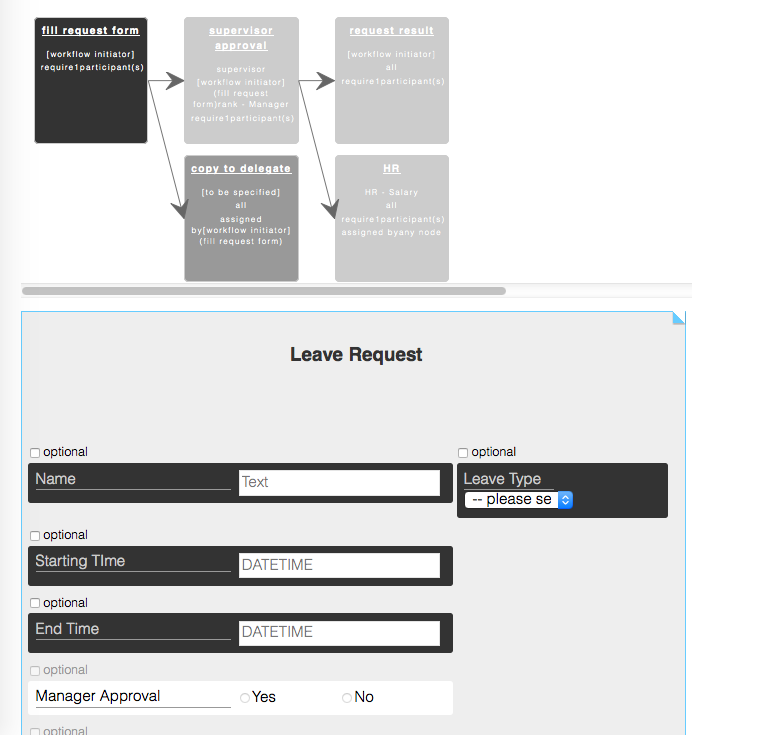
Below is the screenshot after adding these fields, please press "Next" to enter the workflow editor.
5.3. Workflow
OmniBPM system has a very large flexibility and convenience towards the design of workflow or business process. The process is carried out one by one through the "task" components. Each "task" may consist of a specific person, department, group, or supervisor who is responsible for completing such tasks. Different tasks can be done "simultaneously", or may be carried out in order. The actual execution of a "task" may be assigned a groups, a persons in a group, a department, or supervisors of some task node.
While designing workflows in OmniBPM system, you only need to consider the workflow of successful completion of the job. Any exception or error condition will not need to be considered. When there are exceptions while executing the workflow, you may use the function of “Rejection" to return the form to any users who signed the form/document before. "Rejection" is a function which could be selected during the execution of the workflow. Therefore, no exception process design needs to be considered. This design allows users to complete the process of setting in a shorter period of time, when the processes are actually executed, it also retains maximum flexibility. Please refer Rejection of Documents chapter for use of the “Rejection” function.
|
|
As “Rejection” needs not bet set during design of flow, so "infinite loop " (i.e., control points of certain "tasks" get back to its own after some connections) will never occur. The system will automatically check for existence of "infinite loop", if there is, an error will be returned. |
|
|
When a person need to involve multiple times in a process, you should add multiple tasks in the workflow for him, each represents the task he need to finish each time he sees the document. Therefore, there will be no infinite loop in the workflow too. |
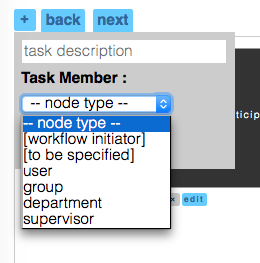
| Node | Help |
|---|---|
[Workflow Initiator] |
User who initiated the workflow process |
[To be specified] |
During the process, other people will assign the designated person for the task |
Users |
A particular user |
Groups |
A certain group of people. In the processes, if a person-in-charge of the node is not specified, then all the people in the group will receive the document. But when anyone completes the task, the file will be removed from the to-do list of all and to be sent to person-in-charge of the next step. |
Department |
A department personnel. In the processes, if a person-in-charge of the node is not specified, then all the people in the group will receive the document. But when anyone completes the task, the file will be removed from the to-do list of all and to be sent to person-in-charge of the next step. |
Supervisor |
An approving officer of members of any task node during the workflow process. |
When designing workflow, a [workflow initiator] will normally be added to the workflow which serves as the start point. During the execution of the workflow process, a “task-node” is satisfied if the following conditions are met:
-
Form Requirements
-
Assignments requirements
-
The number of signatures requirement
If these conditions are met, the task will be considered as completed. When a particular task node’s incoming connecting tasks are all completed, all members of that node will receive notification and the task is now ready to be processed by the next team of people.
This concept is the core concept of the design process , we repeat it once again here.
|
|
When a particular task node’s incoming connecting tasks are all completed, all members of that node will receive notification and the task is now ready to be processed by the next team of people. |
Now we will continue to configure the workflow of leave request. In this step we shall define the sequence of the tasks and who will be approving such application.
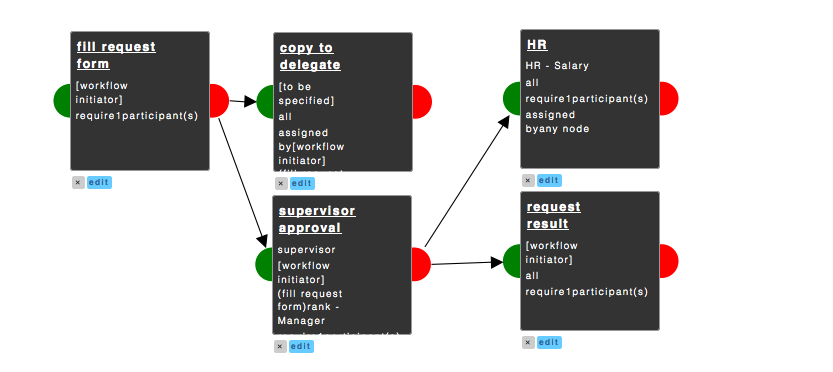
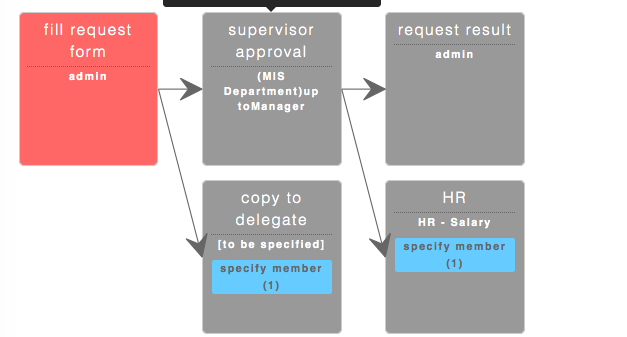
The workflow of leave rquest is as follows :
-
Arbitrary user initiated "leave request". He fills the request form and select the delegated person that will be responsible for his job while he leaves.
-
Initiator’s supervisor approves. In parallel, the delegated person will also be notified for his approval.
-
After the supervisor agrees, HR department will be notified together with the initiator no matter the delegated person signed the request or not.
While adding a new process node, press "+" and select the type of node.
Node of application could be established based on the following sequence .
-
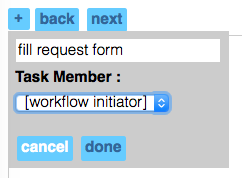
Arbitrary user initiated "leave request".
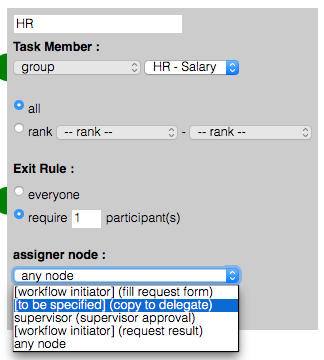
Add "Workflow initiator" node, the task is to "fill request form".
-
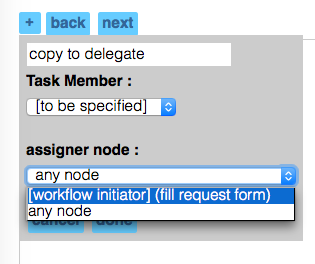
Initiator select the delegated person that will be responsible for his job while he leaves.
Adding "designated responsible person" node , the task description is "copy to delegate", and specify "Workflow initiator ( fill request form )" as the asigner node.
-
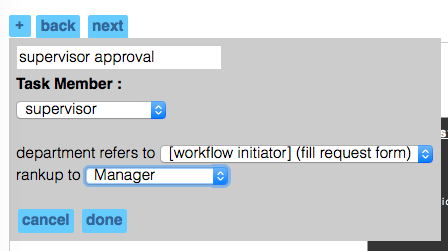
Acquiring approval from the supervisor of the initiator, “while” also from the “agent” during leave.
Add "supervisor approval" node , the task is "supervisor approval", supervisor refers to "Workflow Initiator ( Filling request form )." Flowchart New connection: from "Flow Initiator ( Filling application of leave form )."→ "Approval from supervisor (Approval from supervisor)" from "Flow Initiator ( Filling application of leave form )" → "designated responsible person (confirm Acting )"
-
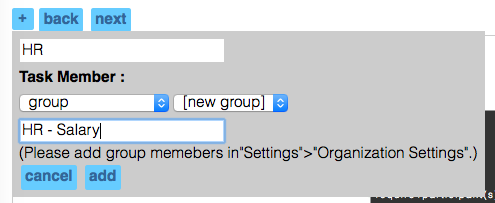
The application will be passed to Human Resources for reference and at the same time the initiator will receive reply from the supervisor no matter the delegated person signed the request or not.
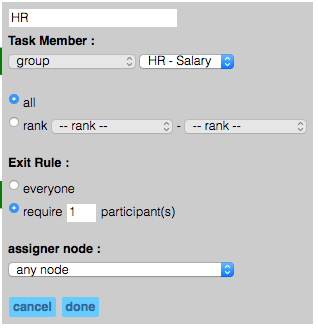
Adding new "Groups" node , choose "New Group" and then add a "personnel - attendance" group , the task is "HR - ROP" Flowchart New connection: from " Flow Initiator" → "HR - Attendance Group ( ROP ) ."
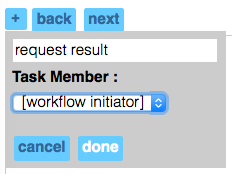
Adding "Flow Initiator" node , the task is "receive approval from supervisor" Flowchart New connection: from "Approval from supervisor (Approval from supervisor)" → "Flow Initiator (Approval from supervisor)."
5.4. Specify form fields that must be filled in a task
This step specifies the fields which must be filled for each task. By default, all required fields must be all filled or otherwise the task will not be considered as be "completed". But you can also set some fields as optional. A form field can be specified to multiple tasks, representatives of these tasks can edit this field, documents shown will be based on the latest editing time. However, OmniBPM will still save old values for reference.
|
|
If the field is not editable by any task, the value of the field cannot be changed - because no users can edit it. Avoid this situation. |
Taking leave application as an example, there are a total number of 5 tasks.
-
Filling in application form of leave
Mandatory fields: "Name", "Start Time", "End Time", and "Leave Type".
-
Copy to Delegate
None. User in this task is only required to click on "sign"
-
Supervisor approval
Mandatory "Manager Approval" field .
-
HR
Mandatory "Copy to HR" field .
-
Receiving notice on senior approval
None.
The operation procedure is as follows, first click on a “task” node at the top of the screen and it shall turn dark (indicating that the field to be filled in is now being set). Then, click on the form fields on the lower part of the screen to select fields that must be filled for the task. The selected fields which must be filled during workflow execution are dark in color now. If this field is optional (not required to be filled), you can check the "optional" button.
|
|
You still need to specify what tasks can modify/fill a field even if the field is optional. If a field is not assigned to any tasks, it can not be edited by anyone. |
5.5. Permission of Workflows
Workflow permissions can be set when the workflow design is complete . Alternatively, you can go to "Settings"→"Workflow and Form Settings" → "Workflow Permission" to update permission settings.. There are two different workflow permissions:
-
Permitted to Run this Workflow
Has the authority to execute a workflow. A person with the permission can initiate this process. For example : all people should be able to run "Leave Request". Only engineer or quality control personnel can initiate "Product Change Notification" workflow.
-
Permitted to Export All Data of this Workflow
After initiation of each workflow, only the workflow initiator and people signed the form during execution of such workflows could access the documents. The so-called "Permitted to Export All Data of this Workflow" refers to the ability for a person to access all data in the forms of this workflow even if he is not the initiator of the workflow nor signed the form before.
For example, for leave request, although all people can initiate the process to apply for leave, not everyone can access to all such forms but only their own requests. If there are more than one person handling leave request in HR unit, the staff can only view those who they handled and no one can see all leave records. If HR executives need to look at all leave records, they could be given the permission "Permitted to Export All Data of this Workflow". The permission allows exporting of related reports and searching of those reports. Please refer to Report chapters for details of exporting reports.
|
|
When the workflow design is completed, the “Permitted to Run this Workflow” must be properly set up. Only users with the permission could see those workflow on the workflow menu. For those not having the permission, the workflow will not show up in the workflow menu. |
5.6. Advanced Setting of Workflows
Just like the example gave in the design of Leave Request workflow, enterprise system manager can use the shortest time to standardize all related processes. In this section we will be introduced some advanced functions so that complicated workflow of enterprises could be implemented in the BPM system.
For the "group" and "department" tasks node , you can set the number of required approving officers. The task will only be completed when sufficient number of approval officers approve the application.
You will need to press “edit” in the following task node, set the “exit rule: required participants”. The preset value is 1 which means that approval from only one person will be good enough to have the task done, you may also set a particular task needs to be approved by all people.
|
|
When there are more than one person completing the task, the first approving officer has to complete the requirements of “form completion”, “assigning people in charge”. The following persons could still edit such fields and the last one who approves such will be taken as the final version. |
When any tasks needs to be assigned a people in charge (PIC) by the supervisor (Hereinafter referred as “To be assigned”), you can press the "Edit" button under task node, and define the "assigner node". While the workflow is executed and reach “the assigner node”, the signing officer of the assigner node must specify a PIC for the node that "To be assigned" before complete the task. Details may refer to task assignment section .
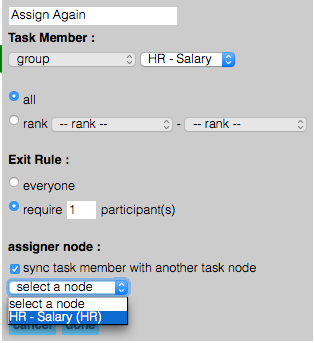
When one job needs the same person repeatedly confirmed in different stages, the function of synchronizing task node could be used. Click “Edit” in the task that is executed later, under “assigner node”, check “sync task member with another task node”, and choose “task node” as “node executed earlier”.
When the flow reaches “node to be executed later”, the system will refer to “node executed earlier” and its PIC, and make it the PIC of “node to be executed later”. If PIC was assigned for the "node excuted earlier", the approving officer of “node to be executed earlier” will be the PIC of the “node executed later”.
|
|
During synchronizing task node PICs, both nodes’ type and constraint conditions must be identical. For example, both nodes must all be the same group, and there is no restriction on the rank level. If there is no task node having the same patterns in the workflow, “sync task member with another task node” checkbox will not show up. |
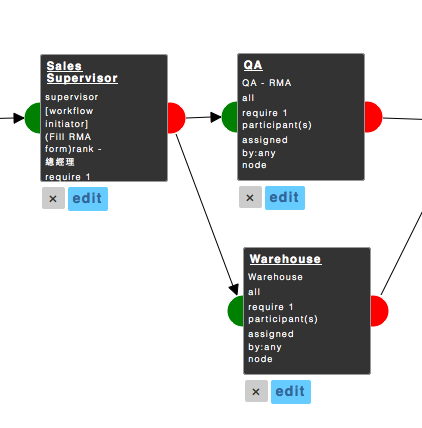
We take a common workflow as an example. For instance, engineering support, where requests made from sales department are send to supervisors in engineering division. After processing by the engineer appointed by the supervisor, the task will be passed to the same supervisor to check whether it’s completed and conform to company standard. Then the result will be sent back to the sales unit for reply and they may be set in accordance with the following ways:
-
Request made to the supervisors in engineering division by Sales Department
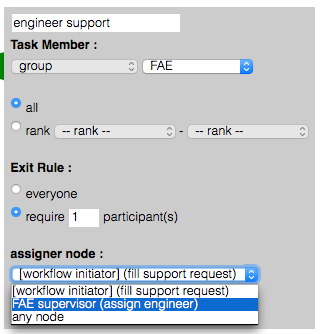
Add "Workflow Initiator" node , the task is to "fill the FAE request form". Add "group (FAE supervisor)" node , the task is to "assign engineer", and connect "Workflow Initiator ( fill the FAE request form)"→" group (FAE supervisor )(assign engineer) . "
-
FAE supervisor assign task to a responsible engineer
Add "group (FAE)" node , the task is to "engineer support", set assigner node to "group (FAE supervisor)", and connect "group ( FAE supervisor ) (assign engineer)" →"group (FAE) (engineer support) . "
-
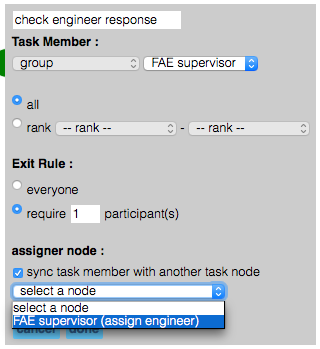
FAE reply is checked by the same FAE supervisor after completion of "engineer support" task
Add "group (FAE supervisor)" node , the task is to "check engineer response”, check "sync task member with another task node" and select "group (FAE supervisor) (assign engineer)" as task node to copy PIC from, and connect "group (FAE) (engineer support)"→"group (FAE supervisor) (check engineer response)"
-
Engineer response return to sales unit as reply
Add "Workflow Initiator" node , the task is "receive support response", and connect "group (FAE supervisor) (check engineer response)" → "Workflow Initiator(receive support response) ."

5.7. Formula Field
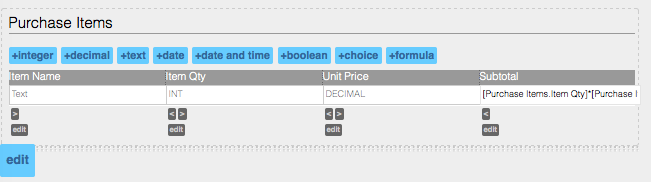
In OmniBPM system, the values of fields in a form can be automatically computed from other form field values by the system. With formula field, a lot of complicated arithmatic calculations can be automated and thus reduce human error as well as increase work efficiency. For example, in a purchase request, subtotals of each requestd item and the total amount of the entire request can be computed automatically from the unit price of each item and the number of units requested. In a leave request, the length of leave can also computed from the starting and the end of the leave.
-
To add a formula field into a form, click "+formula":
-
Enter the name for the formula field and the formula:
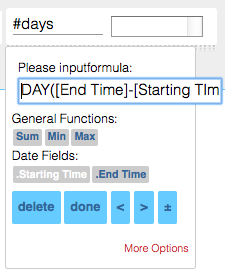
Here, we set the formula to "DAY([End Time]-[Starting TIme])". Click on "done" to complete adding the formula field.
|
|
When writing formula, the value of fields can be accessed by using [Field_Name], i.e. field names enclosed in square brackets, []. In the above example, [End Time] reprersents the value of field "End Time". |
|
|
Since field values are represented by their field names, it is not possible to use a field name that appear multiple times in a form in a formula. Avoid having multiple for fields with the same names. |
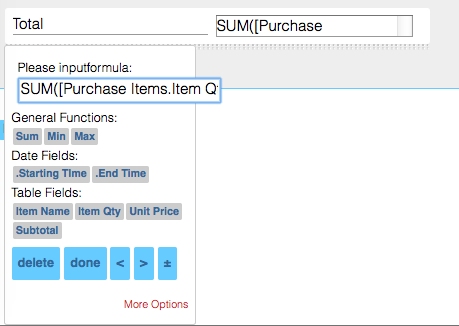
We can also use formula field in a table.
-
Click on "+formula" in a table to add a formula field to a table:
-
Enter field name and formula for the field
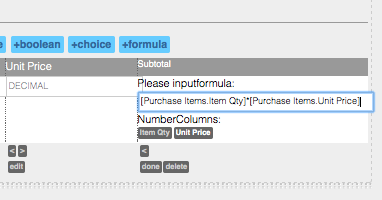
Here we set the formula to "[Purchase Items.Item Qty]*[Purchase Items.Unit Price]" to have subtotal computed automatically.
In a table, column values are represented by [Table_Name.Column_Name]. In this example, table name is Purchase Items and colum name is Item Qty and Unit Price. Formula field outside tables can also refer to table columns. In the above example, we can have total amount of the entire request calculated by using SUM([Purchase Items.Item Qty]*[Purchase Items.Unit Price])
| Function | Can use in Table Columns) | Description |
|---|---|---|
MAX() |
O |
Maximum value |
MIN() |
O |
Minimum value |
AVG() |
O |
Average value |
SUM() |
O |
Sum of values |
IF(C, A, B) |
X |
When C is True, return value of A, otherwise return value of B |
DAY() |
X |
Convert value to dayes |
HOUR() |
X |
Convert value to hours |
|
|
When "Can use in Table Columns)" is "O", the function can only be used on a column of a table outside the table. For example, function "SUM" will add all values of a table column or a expression with table column in it. It can not be used on expression without any table column. |
5.8. Skip Tasks Base On Form Field Values (Conditional Tasks)
In a complex workflow, the necessity of some tasks might dependend on values from filled form fields.
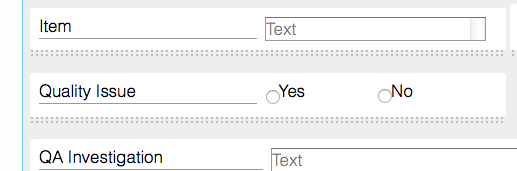
For example, in a RMA ( Return Merchandise Authorization ) workflow, it is necessary to have QA personnel be involved when the reason of the return is quality related issues. If the return is unrelated to quality issue, the QA personnel should not be involed. In this example, we can add a "Boolean" called "Quality Issue" to the RMA form. Other QA related form fields should also be added into the RMA form.
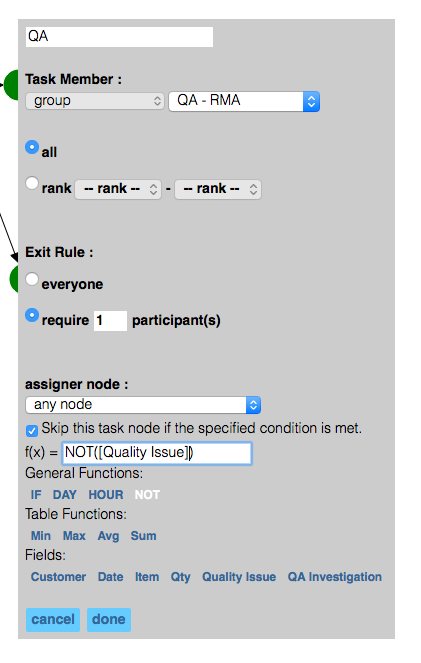
When designing the workflow ( process ), we should put QA process into the workflow. In QA related tasks, we need to configure conditions for skipping the tasks. When the condition is met (evaluates to True), the tasks will be skipped and all the reqirements for the task, including filling forms, assign people, etc, will be ignored. Here, the condition that QA task should be skipped is Not quality issue. Click "Edit" button of the task node, check "Skip this task node if the specified condition is met", and enter the condition "NOT([Quality Issue])".
|
|
When Conditions to skip a task is met (evaluates to True), all the requirements for the task will NOT be enforced. The task will be skipped directly regardless of any unfulfilled requirements. |
For more detais on how to write conditions ( formula ), please refer to [Formula].
5.9. Workflow Menu
Completed workflow will appear in the workflow menu after selecting “Activate this version as running version” in the first step of workflow editor.
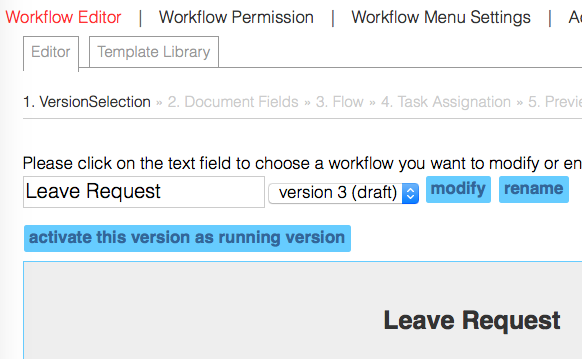
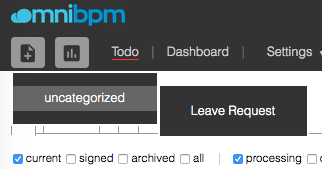
The preset category of any new workflow will be "uncategorized".
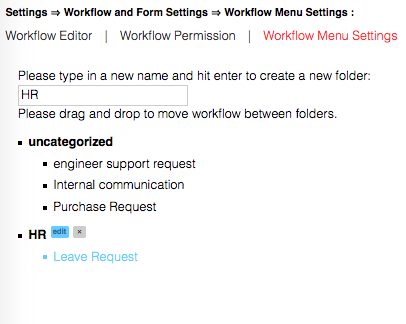
If you would like to classify workflow into categories, select “Settings”→"Workflow and Form Settings"→"Workflow Menu Settings" . Please enter the category name you want to set up , such as "HR", "QA" , and then drag the original "Uncategorized" workflow to “HR”, like this:
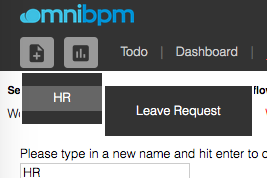
This is the final screen . You can see the menu has no "Uncategorized " category.
5.10. Modifying existing workflows
All workflows are version controlled. If any documents or fields within existing workflow needs to be modified, they could be changed accordingly. All completed documents will be kept at the state while the document is approved. All approving documents will be executed based on the workflow and form settings at the time workflow been initiated. All newly initiated process will be executed based on the newly effective form and workflows.
6. Report
6.1. Overview
OmniBPM provides functions of generating reports. The report function let user gather all statistics and information in the BPM system. Each report can include information of one particular workflow. There are two roles when using the report function. The first one is “Report Designer” who design which fields are to be exported and the data filtering criteria, while the “Report User” who export reports according to the preset criteria (i.e., the report designed by “report designer”. Addition data filter can be added while exporting the final report. Ordinary users(Report Users) could go directly to the section generate reports.
|
|
For the same workflow, as different roles of the same company may require different information, some information of a particular form (field) may be accessed for some particular roles only. This use case can be fulfilled by Report function in OmniBPM. |
For example, if we are creating a report on “total number of hours of sick-leave”, this report shall be linked to “Leave Request” workflow. The report collects all the forms that has “sick-leave” as leave type, and sum over the leave hours for each of the employee name. In this section we will divide into two sections, design report templates and generate reports.
|
|
Before you begin designing reports, you must make sure that "Report Designer" have "Report Management" permission. Otherwise they cannot see the function menu to edit the report. Please refer to Permission management section . |
|
|
"Report User" does not require "Report Management" permission. Please refer to rights management section. The permission to run a report is set individually for each of the report. PLease refer to Permission and Menu of Reports for more details. |
6.2. Design report template
6.2.1. Adding new report/editing report
In "Settings" → "Report Settings" → "Report Editor", user can add , preview or edit the report templates. Here we create a "leave report". Enter "leave report" as the report name and select "Leave Request" workflow as the source of the report. Click "Create".
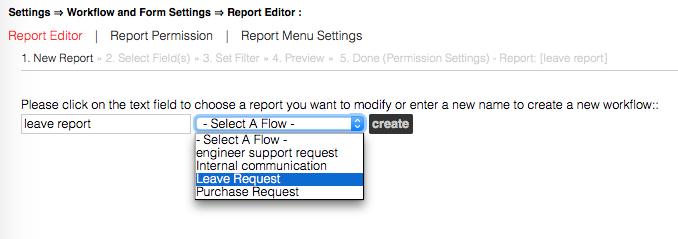
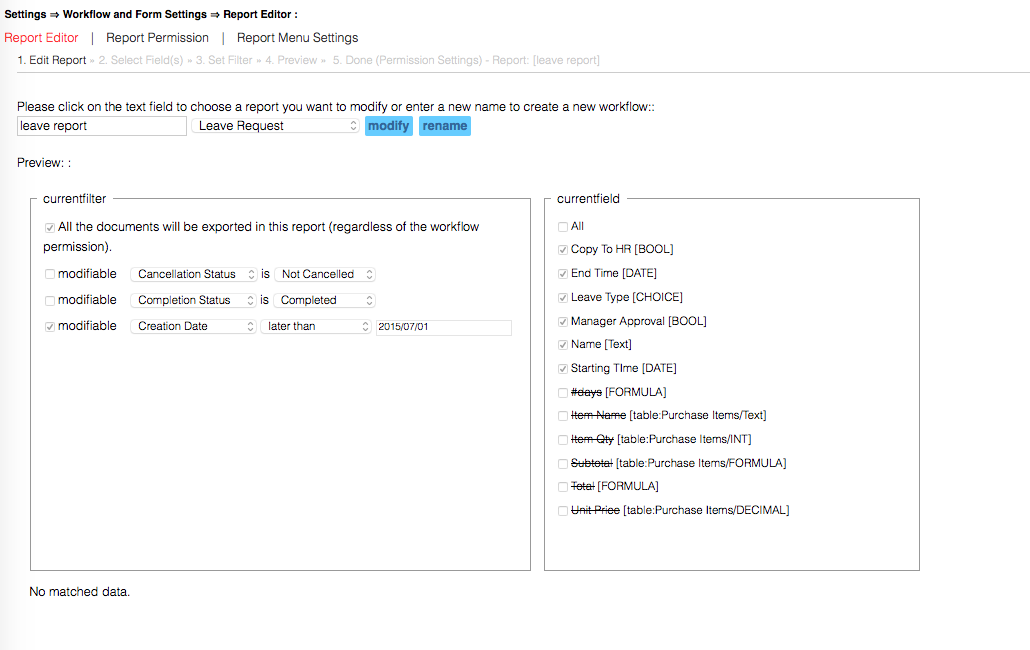
If any report needs to be edited, please select the ‘name’ field and choose the existing report, or enter report name directly. After selection the system will bring it out, and click ‘Modify’ the changes will be made effective.
6.2.2. Selecting fields
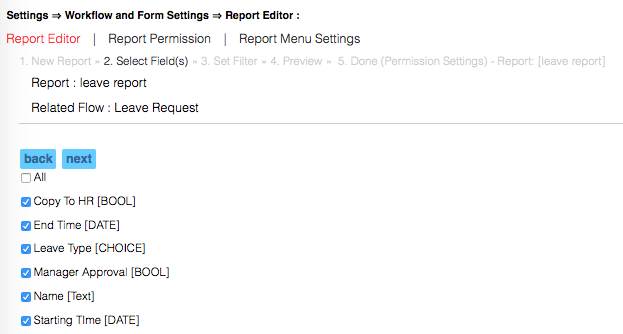
The next step in designing a report template is to select the fields to be appeared in the report.
The purpose of generating "Leave Request" report is to list all completed leave requests, so we choose "Names", "Start Time" and "End Time" as exported fields.
|
|
When selecting fields , some fields may belong to the old form which will be crossed out. These older versions of the field does not exist in the form of the existing process. But if you want to export the information from the old form of materials, these fields need to be selected. |
|
|
While generating reports, users could only export the fields based on the fields selected here. If any field is not meant to be exported, do not select them and they will appear in the report. |
6.2.3. Setting selection criteria
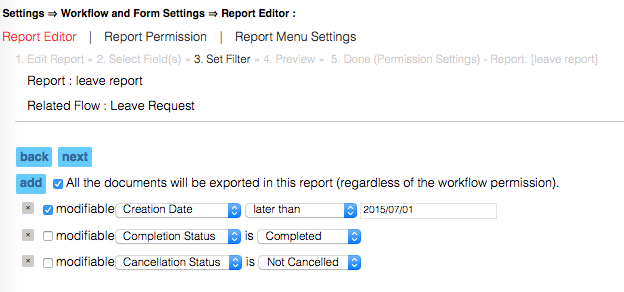
In general, "Report User" can only export documents from workflows he initiated or documents he signed. If the “Permitted to export all data” in the Workflow Permission is granted to a user, he can export all documents of that workflow. In the report, if the "Report User" who needs to export all data of a workflow, "Report Designer" needs to select "All the document will be exported in this report(regardless of the workflow permissions )" here. Otherwise, when exporting data, "Report User" can only export the file that the user could read .
Data filtering criteria are divided into two types:
-
Allow modification
Allows "Report User" to modify the selection criteria created by "Report Designer" in accordance with need.
-
Cannot be modified
"Report User" is not allowed to modify/delete/alter the selection criteria created by "Report Designer".
|
|
Not modifiable filtering criteria could base on form fields and could be set in the report to limit "Report User" to access only a subset of data. |
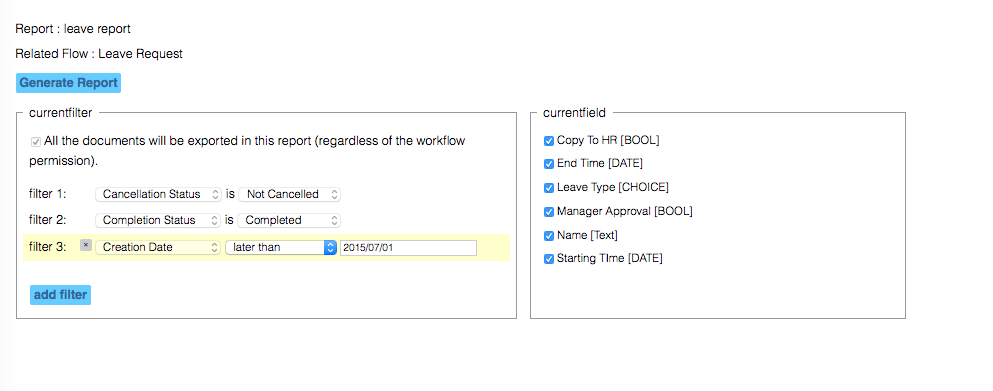
Here we add the selection criteria:
-
Check "All the document will be exported in this report(regardless of the workflow permissions )"
-
uncheck "modifiable" " cancel state " is not canceled
-
unckeck "modifiable" " completion status " Completed
-
check "modifiable" " creation date " as 2015/7/1
|
|
If you want to design a personal leave record reports, you can uncheck "All the document will be exported in this report(regardless of the workflow permissions )". Only personal "Leave Reuqest" could be exported. (Or those which are “accessible”) |
After pressing "Next" to preview the report in accordance with the current output selection criteria. If there is no problem, press "Save" to set the permission of the report.
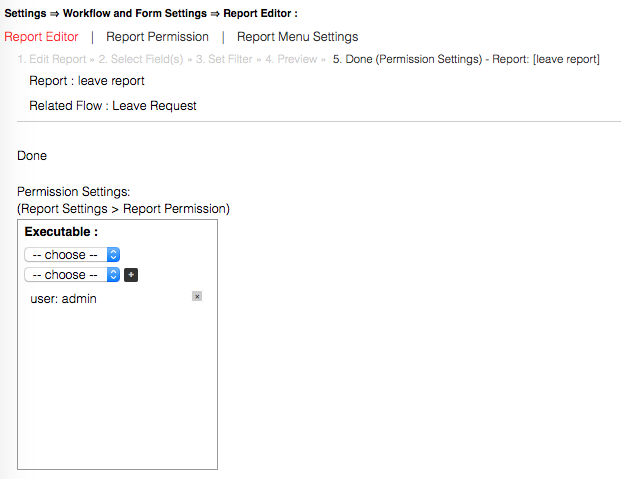
6.2.4. Permission and Menu of Reports
A "Report User" can only see and run a reporrt from the report menu if the user has report "executable" permission.
|
|
After completion of design of a report, you must add “Report User” to the “executable” list. Otherwise they cannot use the report. |
Here we add “admin” to the “executable” list.
Report menu settings are similar with workflow menu. Please refer to Workflow menu section .
6.3. Exporting Report and Export to Excel
"Report User" can choose the report you want to export from the menu .
|
|
After completion of design of report, you must add “report exporter” to the “accessible” list or otherwise they cannot execute such process. |
When you want to export a report, select the report you want to export from the report menu.

Once the desired report to be exported is selected, the system will list out all selection criteria and those fields which could be exported. Criteria of yellow background color in this “current criteria” are those which can be edited. Users could also add “new filtering criteria” by themselves. Those fields in white background color are those which cannot be changed. “Current fields” are all fields which could be exported by users. Users can un-select those unnecessary ones. After clicking “Create Report”, the report will then be created.
After you export the report, in addition to the exported data displayed in the web browser, you can also press "Download" to download the Excel format file.

|
|
“Date” and “Date and Time” in the exported Excel file could appear as a number. You must change the format of such column to date time in Excel so that they can be displayed properly. |
7. Start the first workflow
7.1. Overview
Operation of OmniBPM starts with initiating a workflow. Once a workflow is initated, the system will execute the following actions until the workflow is completed.
-
Checking the current tasks and the person in charge(PIC), and have the documents sent to PIC.
-
PIC work on the task until all the following requirements are done: fields that needs to be filled, assigning PICs, and real task defined by the enterprise. Those who are not involved in the process could also be copied.
You may refer to Form Filling section while doing “fields that needs to be filled”, assigning PICs may refer to Job Assignment section.
7.2. Menu of Workflow
User needs to log in first to initiate a workflow. After logging into the system (Please refer to Login, there will be a workflow menu on the top left hand corner. Select the workflow that you would like to execute.
|
|
If you do not see the process that needs to be performed, please notify the system manager to turn on the related permission. |
After initiating the workflow, the system will bring out the forms required to complete in this workflow:
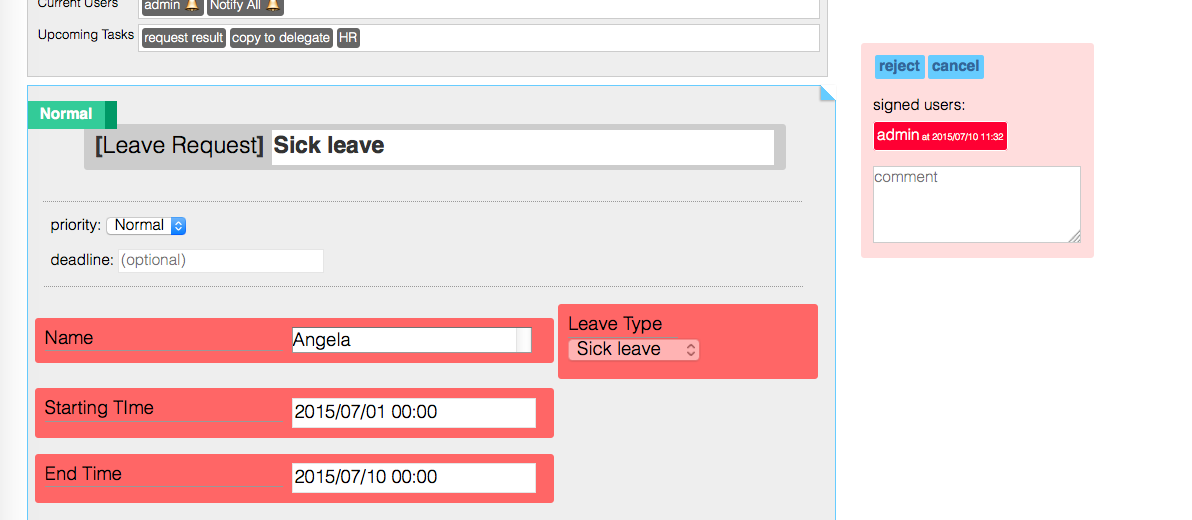
7.3. Progress brief of a workflow
The top item in the list refers to the progress of workflow.
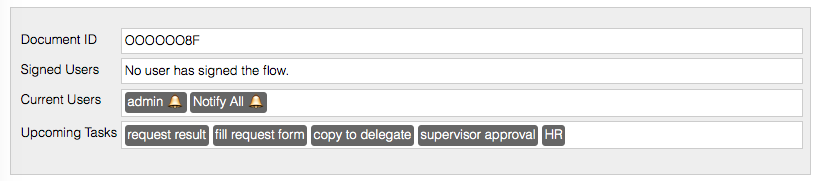
-
Document ID: Document ID of this document. Each document has a unique document ID. You can use this number as the basis to communicate with others. For example: Please help me look at the document number 036 .
-
Signed Users : List of users that signed the document
-
Current Users: List of users that is person in charge of current tasks
-
Upcoming Tasks: Tasks that need to be done before the workflow be considered as completed.
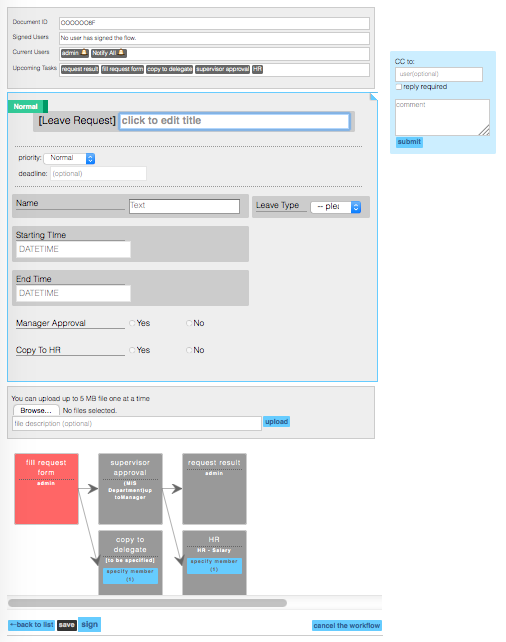
7.4. Form filling
In this step, BPM system will ask users to fill required form fields configured in Specify form fields that must be filled in a task. All required fields of a task shall be filled until a document are to be sent out to the next step. At the moment when the workflow is initiated, the PIC of the first node is “Workflow Initiator”. For workflow initiator, even when there are no required fields in the form, the title of the document must be entered.
Workflow priority can be one of Urgent, Priority, or Normal. Workflow Initiator can change the priority anytime before its completion (Just click save). *Deadline could also be set.
|
|
Workflow initiator can modify "document title", "priority" and "deadline" at any time. |
Fields with dark gray background are required. They are the criteria for completion of a task node.

Optional fields do not have to be filled in, they may even be left blank
There might be one or more tables in a form. User can add table rows by "+data row" to add a table row.
Table columns are also classified into required and optional, as long as there is a table field being required, then at least one row of data will be needed to complete the task.

7.5. Copy and Discussion
The function of copy is like the "carbon copy to(CC to)" function in email, which allows others to follow the progress and join discussions
People being copied the document, even though they are not part of the workflow, can still view the documents. (Details may refer to Todo list and document management)
After initiating the workflow, all people who have access to this document, regardless of whether it is approved, or whether it is completed, the document could be copied to any other person.
The interface is as follows;

Enter the “user” in the field “username”, and enter “comment” when necessary (you can also leave it blank), then click “submit” and the copy will be sent.
Those who are copied the files could view the files in their todo list.
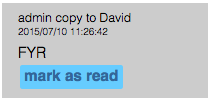
|
|
User must click on the "mark as read" to indicate that he read the document and has no comments. Before the "mark as read" is clicked, the user receiving the copy will considered as one of the currently responsible user. And the workflow will not be considered as completed before all the copied user click their "mark as read". |
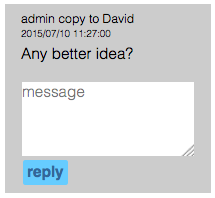
If reply is required for the user receiving the copy, check "reply required" while making a copy, A comment textbox will be shown when the receiver open the document. Only when comments are entered and “reply” is clicked, the receiver is considered to fulfill the responsibility.
At the right side of this document, you can see a list of all copies, comments, and discussion of this document. All messages in the list will be marked Read, Unread or Pending Reply.
|
|
When the user leaves the page, if there is any Unread or Un-replied copies, system will alert the user that there is a need to respond to this message. |
7.6. Upload Attachments
All users who can view the document can upload related attachments.
The uploading attachment block is located at the lower part of the form. Click "Browse" and select the file you want to upload.
If necessary, enter details in “File Description”. (You may leave it blank)

Finally, click "Upload" and you can see the uploaded file name appeared below .

Click on the red arrow at the right of the file name
 You can download the attachment.
Click "delete" on the right of the file name to mark the attachment as deleted. System does not really remove the attachment, they are only marked as deleted. Attachments which are marked as deleted may be restored through “recover”.
7.7. Workflow and assignment of tasks (Assigning person-in-charge)
All users who can view the document could get access to the document and assign people in charge (PIC) of any node.
Node which could accept assigned PIC must be placed behind the current node and may be of the following cases:
-
Responsible unit of the node is a group or a Department, and the node only needs a few group of people to approve.
-
Responsible person of the node need to be assigned by PIC of another node. (See Appoint a person to be responsible for a task node)
|
|
If the person in charge of setting task node B is determined by the A task node, Then assigning PIC will be A node’s Required Task. A person in charge of processing node A must be in charge of assigning the PIC of node B , Otherwise, the signature cannot be sent out. |
Task node that can have PIC be assigned will have a blue specify member button, and the number within the blanket refers to the number of people required to complete the task.
Click the "specify members" , the system will pop up a dialog box that lists the user in line with the setting of node.
Select specified number of users and click "Save"
|
|
If the person in charge of setting task node A but no PIC is assigned, then this document will appear in all Current list of the department. But if a PIC is assigned, only the PIC’s account will list out the documents. (See Todo list ) |
7.8. Approval and Dispatch

The significance of “Approval and Dispatch” is the PIC of node confirming their completion of all tasks in a node. When all PICs (One node could have several PICs) of the node approves, then the task will be passed onto the next stage.
Unless being rejected (Refer to Reject), contents of all fields will not be able to change after approval and dispatch.
|
|
"Sign" button will only appear in the user interface of the person responsible for this node. IF the user could only read, or the task is completed, the "Sign" button will not appear. |
If the task has not been completed on the node , the system will prevent the user to approve it, and the unmet requirements will be marked in yellow. The reasons could be:
-
There are specified field which are not filled properly
-
There are "assigning PICs” tasks need to be done. ( See process and task assignment )
Before approving, you can press the "Save" to save the contents of the form to fill in at any time . When the "Save" button is dark , it means the information is already up to date.
7.9. Document Rejection
Rejection of documents is a mechanism to reverse the workflow. When the person in charge of the current task finds any problems, or for any other reasons, he wants to step back into the workflow a few steps, he can use this function.
All People who have access to the document could reject the documents.
Generally, those who perform rejection is the PIC of current node or Copied users.
-
When the “Reject” button in the upper row is pressed, there will be a pink “Return block” at the right hand side appearing in pink.
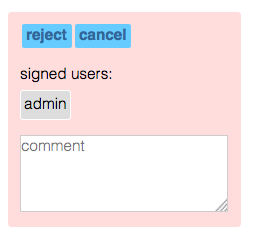
-
All the people who signed this document will be listed, select the person to receive the rejected document. The fields that the receiver of rejected document responsible for will be marked in red. Press the "reject" button.
All people signed after the receiver of rejected document will be required to review and re-sign the document after the receiver revised the document.
7.10. Workflow Cancellation
"Cancel" button is located below the workflow chart at the bottom of the document.
Only Workflow Initiator can cancel a workflow.
Cancelled process will not be able to progress and not able to be copied to any person. It means that this flow is completed abandoned.
Completed documents could not be cancelled. If you would like to view the cancelled documents, click “cancelled” item in the “Todo list filters” (Please refer to Todo list filters).
8. Todo list and document management
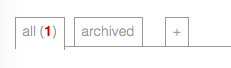
At the top of the screen click “Todo” then you will be able to enter the “Todo List”. In the parenthesis is the number of unread documents.

|
|
The number in the parenthesis at the back of “Todo” refers to number of unread documents based on the current list selection criteria. If the criteria changes, this number may also change. |
|
|
By default, the "todo list" lists all the document that require current user to work on. If current user fulfilled the requirement of the workflow, the document will not be listed in the "todo list". |
8.1. Table showing pending tasks
To-do list is an important core function of OmniBPM.
Only if one of the four following conditions is met, document might appear in the “Todo” list (subject to other filtering conditions Todo list document fliters). This secures the document from unauthorized access. On the other hand, this also ensures that the file not related to me will not appear to enhance efficiency.
-
The file is created by yourself.
-
The file is signed by myself
-
They have permission to read the document . There may be in line with the process set in its own read permission (see Workflow permissions ) , there may be someone to own a copy of this document (see Copy and discussion )
-
The flow file is in need of self-handling. That is, the file is in one particular task node, and you meet the criteria of task identity specified node types

The fourth condition is more complicated, for example , If there is a leave request file on HR node, then HR node will be completed by "HR- attendance" group, if I am inside the “HR-attendance” group, the file will appear in my own todo list.
8.2. Todo list document filters

Documents are classified based on the user processing status and workflow status. We can use the following Todo list filters , the combination of user process status and workflow status to filter out the desired documents. "User processing status" includes current, signed, archived, and all. "Workflow status" includes Processing, completed, and canceled.
-
According to the user process state
User processing status Description Current
documents that requires current user’s involve. There are two cases :
- Documents requires current users' approval . ( The document is within a node of the workflow and the user fits the description of the node.)
- Document is being copied the user.
signed
user signature was on the document or documents have been rejected
Archived
User archived document , see Archive
All
files that match Document list conditions any of the four conditions of todo lists
When selecting two or more of these four options, its meaning is "or". Such as: select "signed", "archived" will list any "signed" or "archived" documents. -
Based on workflow status
Workflow Status Help Processing
workflow not yet completed
Completed
workflow completed by all participants and copied users
Canceled
workflow has been canceled, see Workflow Cancellation.
Similarly, when two or more options are selected in these three options, its meaning is "or." But the condition "user process status" and "workflow status" must be met at the same time.
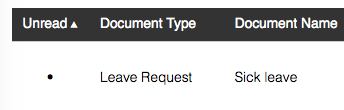
8.3. Columns in Todo list

To sort the documents by its attribute, clicking the column header of that attribute with the exception that the "Tag" column can not be sorted.
| Column | Help |
|---|---|
Unread |
unread documents will have a black spot marked.
Indicating that a user has not read the latest version of the documents Even if the document has been signed, if it has been updated in any task node or the status of its copy has any change, (see Copy and discussion) it will still be marked as unread. |
Document Type |
Name of workflow, see Name of workflow. |
Document Name |
The title of the document after initiating the workflow, see fill out the form. |
Deadline |
Deadline of the document, see fill out the form. |
Priority |
document priority, see fill out the form. |
Tags |
tags on documents, see Tagging. |
Creator |
Workflow initiator |
Created |
Time when the document was created. |
Last modified |
the time when the file was last updated, including filling forms/signing documents/update titles/etc. |
Task Description |
name of the current task in the workflow. See Workflow. When this column is blank, it indicates that all processes have been completed. |
|
|
After entering the system, click "Todo", the inital status in the to-do list will be User processing status will be current Workflow status is Processing. All unread documents will be on top of the list. |
8.4. Tagging
There are two types of tags: Personal tags and Public tags. Personal tags are visible only by the user that create them, and public tags are visible to all users within an organization.
We can add one or more tags to any documents which increases the flexibility of management of document classification.
For example, one can put public tag "Project A" on all documents related to project A. Everyone in the organization can see "Project A" tag. User can even use "Project A" as a document list filter. One can also put "Done this week" personal tag on all documents that need to be done this week.
TIPS: One can add tabs on todo list with a tag filter. Please refer to New tag page in todo list.
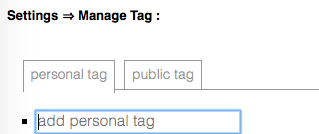
8.4.1. Tag Management
Click on the top menu "Settings" → "Tag management" to enter the tag management page , select the "public tag" or "personal tag" tab to manage tags.
-
Added Personal Tags:
Personal tags are not classified and do not need to set permissions. In the " Add a personal tag " Enter a name , press Enter to add personal tags. Existing tag may be deleted using the "Delete" button, or click "Edit" to change the name .

-
Adding Public Tags :
Public tags are classified into categories. To add a new category, enter the new name under “new category" , and press Enter.
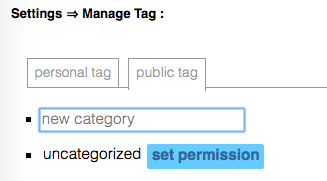
Enter a tag name in the "New tag" and push enter to set up a new public tag under the category.

User need to have proper permissions to add/delete/edit public tags. For tag permission settings, please refer to Tagging Permission
8.4.2. Tagging Permission
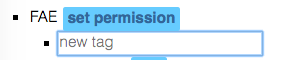
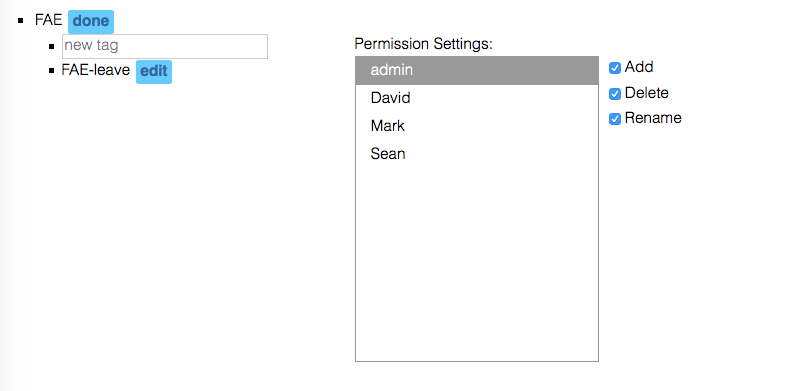
The permission must be configured for newly created public tag categories. To configure the permission, please click on "set permission".
In the permission menu that appears, select the authorized users, and, where appropriate, check on the "Add" , "Delete", "Rename" permission at the right side and click "Finish".

8.4.3. Tagging new documents
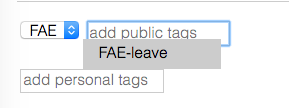
Tag block is located at the bottom of the form . The first line is used to put public tag on the document, and the second line is used to put personal tags.
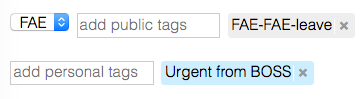
As shown, the first line of the menu contain all categories of public tags. To add a public tag "FAE-leave” as example: select "FAE" tab, enter "FAE-leave" then press Enter . Alternatively, you can click the input box , the system automatically lists all the tags under “FAE” category, click on the desired tag.
Tag will be attached to the file at the end of the input box . Click the "x" to remove a tag from a document.
|
|
On the todo list , you may click "+" in "tag" column to add a new tag on the document. |
8.5. Creating a new tab for a tag in todo list
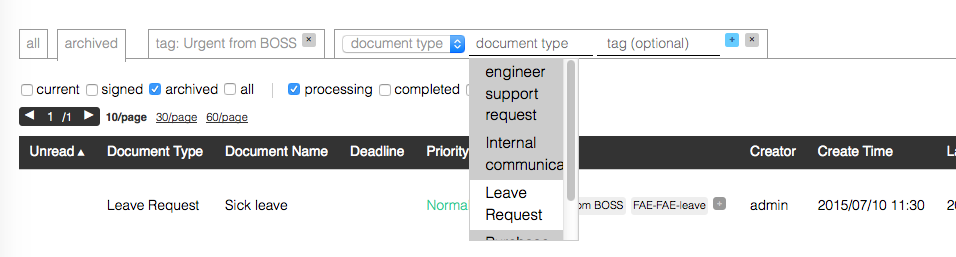
To be able to find out a tagged documents quickly, adding tag tab is a very useful method. At the top of the todo list, click "+" and the following filter will appear, click “Tag” in the menu.
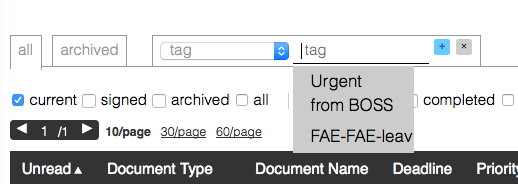
Click on the text box right to the dropdown box, the system automatically lists all the personal tags and public tags. From the previous example, we select "Urgent from BOSS" , and click the blue plus sign at the right of the blue, it is done.
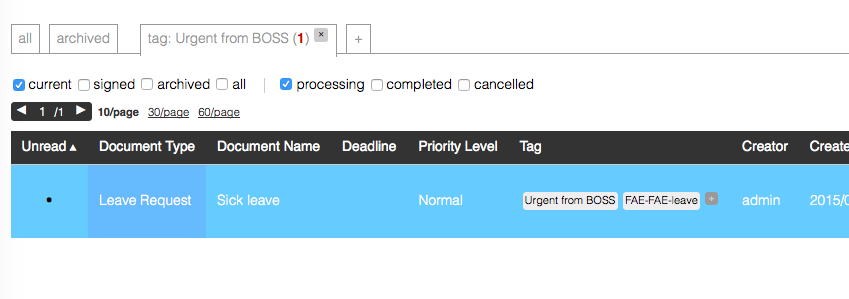
After that, just click on the top of the list of todo 's "tag: Urgent from BOSS" tab, it will filter documents with this tag immediately.
8.6. Tags as a Project Management and Document Management tool
OmniBPM has a comprehensive todo filtering system towards the pending tasks, working well with tags, and can be used as a project management tool.
Please refer to tag management for information on public tags, and Workflow permissions on accessibility permission settings of workflows.
Supervisor of Project Management and Document Management may need to have the permission to export all data of a workflow type(See Workflow permission). If the permission is granted to the supervisor, even the workflow does not go through the supervisor, he can still list the document in the todo list.
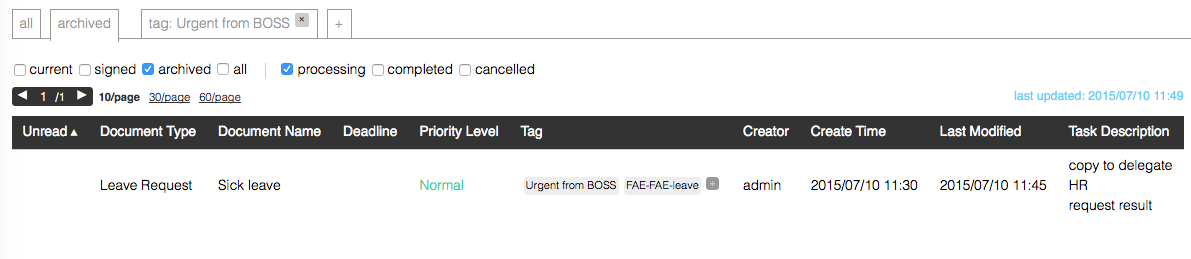
If supervisor needs to list out all related documents of a project as soon as possible, you will need to mark those documents with the same public tags.(see tag management for more info on public tags ). At this moment the public tags could be named after the project. When the supervisor needs to list out all related documents, s/he may make use of tab for a tag in todo list and filter on the public tag, and choose "all" items in Todo list filter, all documents with this public tag will be listed out.
When the manager needs to track a particular progress, s/he can choose the workflow name under tab for a tag in todo list tab and choose "all" items in Todo list filter, all documents could then be listed out.
8.7. Archive
When a document could not be processed now and need to wait a certain period of time, user can use "archive" function to temporarily remove the document from the default todo list. This function can help user to manage documents that can be processed immediately and documents that need a certain time before it can be processed.
As long as the status is "Processing" (either "current" or "signed") , user could see the “Archive” button at the top or the bottom of the document.
For those archived files, they will neither be deleted or cancelled, after the designated archiving period, they will reappear in the todo list. Appropriate use of archive can help highlight the priority documents, it will also enable the file to be processed more timely and fit with personal schedule.
There are four options, namely 1 day, 3 day, 1 week or ‘Others’. Archive for 1 day means that it will appear in the to-list after 24 hours and so on. When selecting ‘Others’, please enter the designated days of archive.

After pressing the "Archive" button , the button will change to "Cancel Archive ," also shows the duration of archiving.

Press the "Cancel Archive " button will release the sealed state of the file, the file will appear immediately on the todo list.
If you want to list out all archived files in the todo list, simply check the todo list filter "archived ". You may also click on the "archived" to select the "archive" tab of todo list which has the same effect with “Archieved”/”Processing” selections and all files related will be listed out.
8.8. Creating a new tab for a workflow ( with/without tags )
Like tabs for a tag in todo list, we can also add new tabs in the todo list for different workflows.
Click “+” at the top and choose "document type". You can directly click on the "document type" input field, or enter part of the name, the system will automatically list the files in line with the classification in typed.
If you also need to add tag filter, you can enter the label at the blank. Leaving it blank is also OK.
After completion, press the blue "+" at right, tab of the workflow will then be added. Click on todo lists and select the tab, the list will then list out all related documents.

9. Delegation
When users leave, for some reason s/he cannot enter the system, OmniBPM provides "Agent" function so that the person in charge of it can appoint others to do the task.
Under the agent mode, the agent todo list will be wholly replaced by the list which is responsible by the former PIC, the user permission will also be completely replaced.
If you want to get back to your own todo list, you have to terminate the agent mode. It will be described in the section Start and End the agent mode.
|
|
Under the agent mode, adding/deleting private tags in the to-do list will change the former PIC’s tags. In other words, all of the changes is equivalent to the action by the original PIC. |
-
Set an agent for yourself
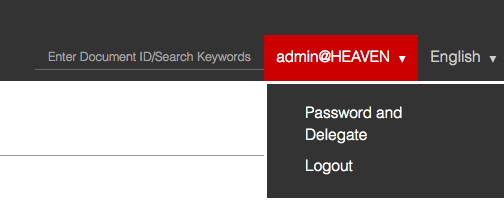
At the top right of the main screen of OmniBPM, click on the small gear next to the username, enter the agent setting mdoe.
In “Agent”, click the column " User" , or enter part of the user name, select any agent from the menu, and press “add” below.
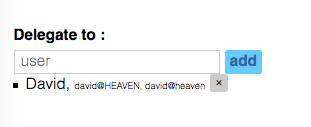
Users can set more than one agent. Qualified agents are not subject to department, grade, permissions restrictions -
Set an agent for others
Users with administrative privileges can use " Management " → " internal management " interface to set up new agents for other users. Click on " job agents " tab in the " new Agent" column, click, or enter a user name to select an agent .

Click the blue "+" number at the back to complete setting new agents .
At the top right of the main screen of OmniBPM, click on the small gear next to the user name, enter the agent setting interface .
In the " Agent" menu, Click the designated users acting as agent, agent mode will be activated immediately.
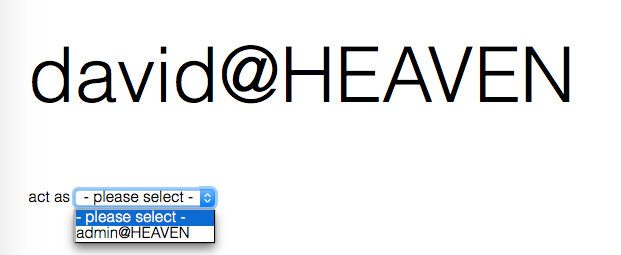
Now, the to-do lists , system privileges will completely be replaced by the agent . User status at the top right corner will also display the mode of being replaced by an agent.
Once the agent work began, at the right of the “agent” menu there appears “done delegation”.
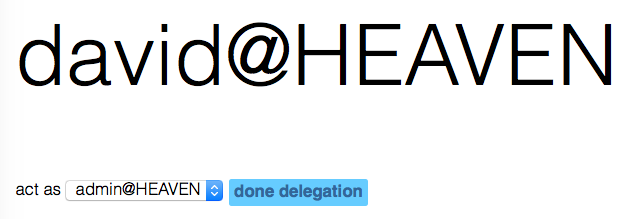
Click and end the agent mode and the user will gain back its original identity.
10. Dashboard
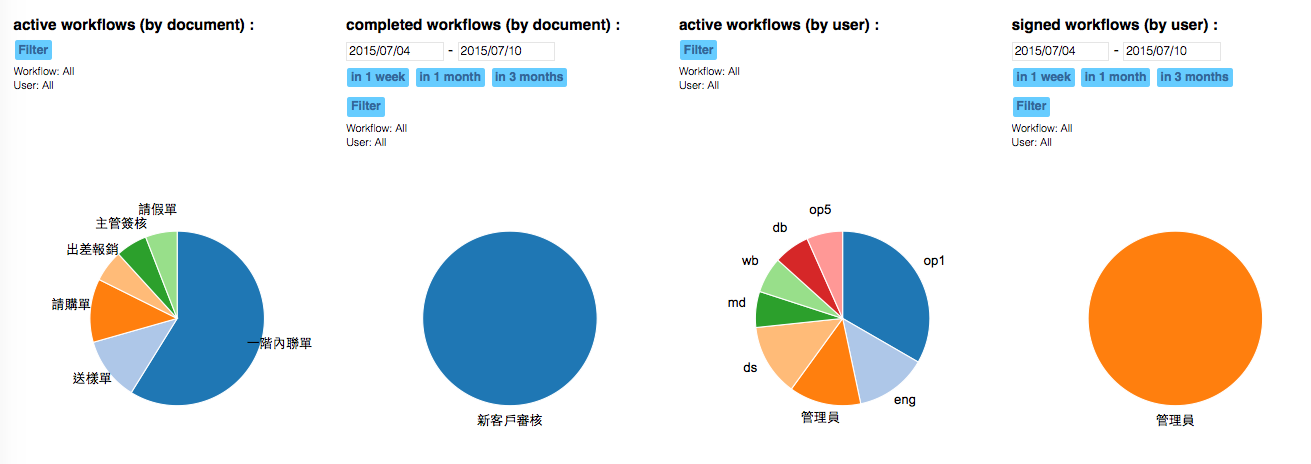
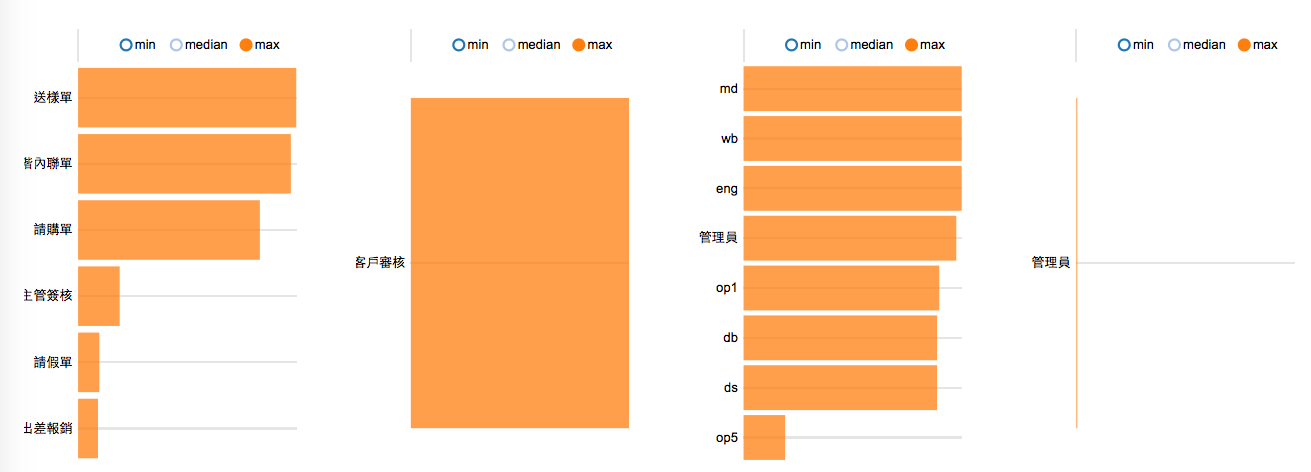
Progress of the business processes can be managed and traced using the "workflow dashboard". "Workflow dashboard" can be executed directly from the menu.

"Workflow dashboard" provides management the internal status of different workflows within the enterprise. The following table shows the meaning of the 12 charts.
Process of executing works in accordance with types of workflows |
Process of completed works in accordance with types of workflows |
Process of executing works in accordance with PIC |
Process of completed works in accordance with PIC |
|
Pie chart in accordance with types of workflows (PIC) |
Pie chart in accordance with types of workflows (Executing) |
Pie chart in accordance with types of workflows (Completed) |
Pie chart in accordance with PIC (Executing) |
Pie chart in accordance with PIC (Approved) |
Bar chart in accordance with types of workflows (PIC) |
Bar chart in accordance with types of workflows (Executing) |
Bar chart in accordance with types of workflows (Completed ) |
Bar chart in accordance with PIC (Executing) |
Bar chart in accordance with PIC (Executing) |
Bar chart in accordance with waiting time (actual processing time) |
Bar chart in accordance with processed time |
Bar chart in accordance with time needed to complete a process |
Bar chart in accordance with PIC (Processed Time) |
Bar chart in accordance with PIC (Time needed to complete) |
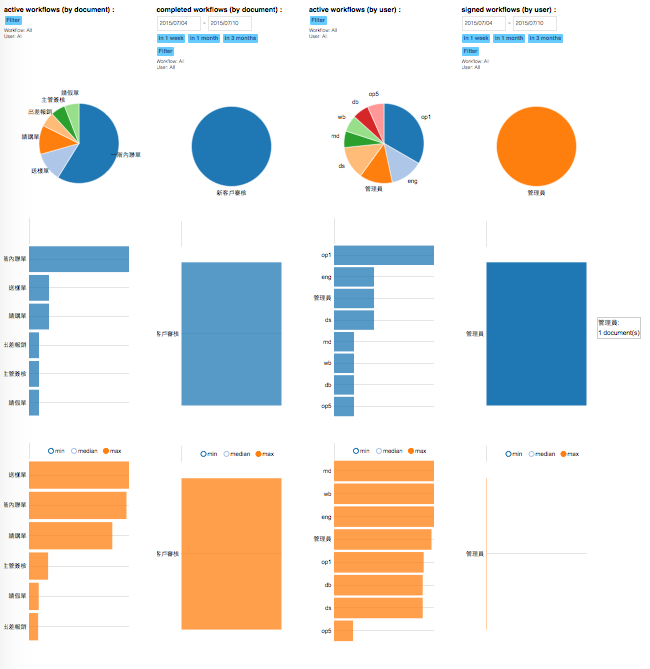
Data in "Workflow Dashboard" can also be analyzed in accordance with different conditions. Press "Filter" and you can choose the type of workflow and personnel as filters. For number of completed workflows and approved documents, user can also choose from “within 1 week”, “within 1 month”, “within 3 months” as the duration of interest.
User can also select the maximum time (max) / Median time (median) / Minimum Time (min) to be displayed for current waiting time ( and actual processing time ).
11. External Database
OmniBPM can use external database as datasource. The BPM system can automatically match data from external database and autocomplete fields when user fills forms. Before using the autocomplete function, external database connection and external database views must be properly configured.
11.1. External Database Connection
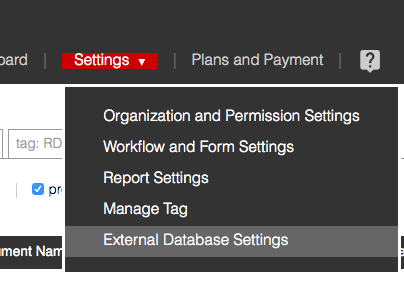
To setup external database connection, go to "Settings" → "External Database Settings" → "External Database Connection".
"Connection Name" is the name of the connection. It is used when setting up external database views. "Database" is the brand of the database. OmniBPM currently supports Postgresql, MSSQL, MySQL, and Oracle. "Database Name" is the name of database in the external database where the view resides.
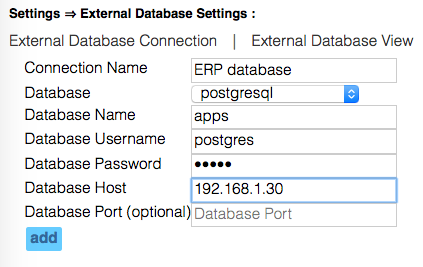
When the connection info is properly set, we can use "test" button to test database connection. If the connection test is done successfully, the system will shows "true".

11.2. External Database View
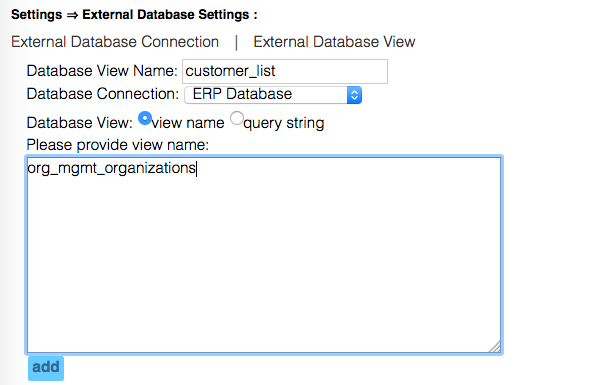
After database connection is set, the database views of interest must also be set. OmniBPM will only access the views give by the users. To setup database views, go to "Settings" → "External Database Settings" → "External Database View".
The "Database View Name" is used when refering to this view while designing forms.
There are two method to add views to OmniBPM system. One is to use existing views in the external database. The other way is to use a SQL SELECT statement. OmniBPM will use the SQL statement as a subquery to retrieve data from external database.
|
|
The SELECT statement will be used as a subquery, there might be performance impact on the external database. |
If the view setting is successful, the columns of the view will be displayed in the database view table.

11.3. Connecting workflow forms with external database
OmniBPM can use external database as datasource. The BPM system can automatically match data from external database and autocomplete fields when user fills forms. While designing forms, user can give the correspondence between columns of external database view and form fields.
|
|
Since one view can be refered multiple times in a form, we will use "Field Autocomplete Group" as group of form fields that corresponds to different columns of the same row in an external database. For example, "product return request" workflow might refer to "material items" database views multiple times, for the returned item, and for the exchange item. Assuming that the exchange item does not need to be the same as the returned item, when information of returned item be autocompleted in the form, the information of exchanged item should not be autocompleted. Therefore, information of returned items and information of exchanged items belongs to different "Field Autocomplete Group". |
When designing forms, user can add multiple "Field Autocomplete Groups". Form fields in the same "Field Autocomplete Group" will be automatically filled at the same time with the data from corresponding columns of the same row in external database.
To add a new "Field Autocomplete Group", look for the text box on the right of the form while designing forms.
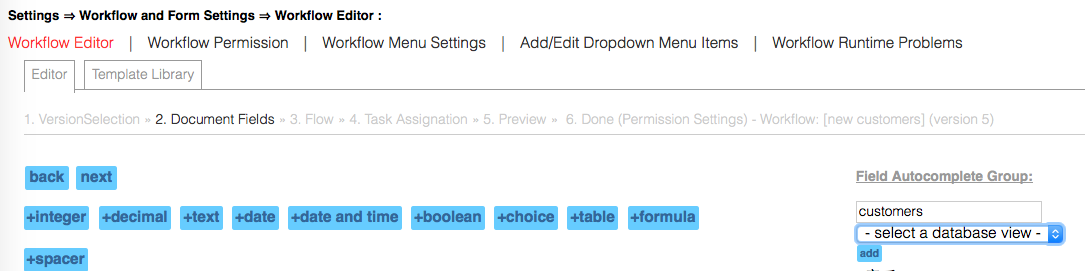
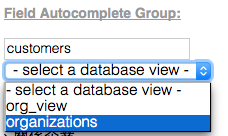
Enter group name and select an external database view and push "add" to add a new group.
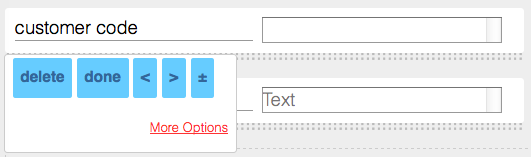
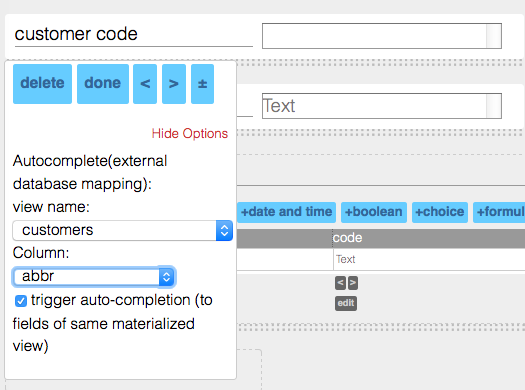
To set the correspondence between a form field and a database column, press "edit" → "more options", and select the "Field Autocomplete Group" the form field belongs to, and then select the column name.
If filling the form field will trigger system to autocomplete all other fields in the same "Field Autocomplete Group" with data from columns of matched row based on this field, trigger-autocompletion must be checked.
|
|
The rule for autocompletion is as follows. When a form field with trigger-autocompletion is filled, and the filled value matched unqiuely to a row of the corresponding external database view, OmniBPM system will retrieve the row and fill-in values for other fields with the corresponding column values. |
|
|
For example, If we want to have "Customer Name", "Customer Contacts", "Customer Address" field be automatically filled only when "Customer ID" field is filled, we need to have all these fields be in the same "Field Autocomplete Group" and check trigger-autocompletion only for Customer ID field. In this way, when a user fills "Customer Name", other fields will not be autocompleted. |